New Zealand and Australian Division
The New Zealand and Australian Division was a composite army division raised for service in the First World War under the command of Major General Alexander Godley. Consisting of several mounted and standard infantry brigades from both New Zealand and Australia, it served in the Gallipoli Campaign between April and December 1915.
| New Zealand and Australian Division | |
|---|---|
.jpg.webp) New Zealand troops disembark at Anzac Cove, 25 April 1915 | |
| Active | 1915–1916 |
| Country | |
| Branch | New Zealand Military Forces Australian Army |
| Type | Infantry |
| Part of | Australian and New Zealand Army Corps |
| Engagements | First World War |
| Commanders | |
| Notable commanders | Alexander Godley |
At Gallipoli, the division landed at Anzac Cove on 25 April 1915, coming ashore as follow-on troops to the initial assault force that had made it ashore earlier in the day, and later occupied the northern areas of the Allied lodgement. After the initial Allied assault at Anzac Cove, elements of the division were sent to Cape Helles in early May, where they participated in the Second Battle of Krithia, launching an unsuccessful attack towards the Achi Baba peak. The division's mounted units were sent to Gallipoli in mid-May without their horses, to serve as dismounted infantry, making up for previous losses. Later that month, the division helped repel an Ottoman counter-attack at Anzac Cove, after which it occupied the line until August, when the Allies launched an offensive designed to break the deadlock. During this period, the division attacked Chunuk Bair and Hill 971, and then later Hill 60. These efforts failed, and as winter set in on the peninsula, the division was evacuated from Gallipoli in mid-December 1915 as part of a general Allied withdrawal.
Returning to Egypt, the division was disbanded in early 1916 following a reorganisation of the Australian and New Zealand forces. The division's constituent infantry brigades were then used to form the Australian 4th Division and the New Zealand Division. These two formations would then be sent to the Western Front where they would take part in further fighting throughout 1916–1918, while the division's former mounted elements went on to serve in the Sinai and Palestine Campaign as part of the Anzac Mounted Division.
History
Formation
Following the outbreak of the First World War in early August 1914, the New Zealand government made an offer to the British War Office of a New Zealand Expeditionary Force (NZEF), which was duly accepted. Mobilisation quickly followed and by late September, the NZEF consisted of two brigades – the New Zealand Infantry Brigade and the New Zealand Mounted Rifles Brigade.[2] This was insufficient to form a conventional infantry division, which usually consisted of three infantry brigades. In contrast, in Australia there were more than enough volunteers for the Australian Imperial Force (AIF). The original intention had been to form a single infantry division, along with a light horse brigade; however, there were enough volunteers to meet this with a surplus of infantrymen being sufficient to form another brigade.[3][4] Initially, it had been planned to send the NZEF and the AIF to the United Kingdom for training prior to their deployment to the Western Front in France; however, as the convoy carrying the troops transited the Suez Canal they were disembarked in Egypt to temporarily help defend the canal following the Ottoman Empire's entry into the war. Later, overcrowding and a shortage of equipment in the United Kingdom resulted in the decision for the Australians and New Zealanders to remain in the Middle East.[5][6]
In December 1914, the Australian and New Zealand Army Corps, under Lieutenant General William Birdwood, was formed to command both the Australian and New Zealand components, which were under the respective commands of Major Generals William Bridges and Alexander Godley. The headquarters staff for this formation amounted to 70 officers and 550 men. These were mostly provided by the British and it was formally part of the British Army.[7] A corps normally had a complement of two infantry divisions, but given the numbers of mounted troops in the AIF and NZEF, Birdwood envisaged that the corps would include a mounted division. As only one complete infantry division (the 1st Australian Division) was present in Egypt, the NZEF and remaining AIF forces in Egypt were to form the other infantry division. Birdwood decided to combine the New Zealand Infantry Brigade with the Australian 4th Infantry Brigade, with a third brigade to be included if one could be formed.[8] By early 1915, Birdwood scrapped the plans for the corps to have an integral mounted division and instead included two mounted infantry brigades with the two standard infantry brigades to form the second infantry division. This was to be known as the New Zealand and Australian Division, with Godley as its commander. A British Army officer, Godley had previously served as commandant of the New Zealand Military Forces from 1910.[9] As well as the four infantry and mounted brigades, the division also included artillery. This was contributed by the NZEF, but only consisted of 16 guns, including four howitzers, much less than the normal divisional complement of artillery. Headquarters staff were also drawn from the NZEF.[8][10] Supporting arms included engineers, medical, signals, and service corps units.[1] The division was initially short of engineers and transport personnel, with deficiencies being made good through recruitment of New Zealanders living in the United Kingdom, or through re-allocating reinforcements from other units.[11]
While the division was forming and training in Egypt, elements were committed to the defence of the Suez Canal. On 26 January 1915, the four infantry battalions of the New Zealand Infantry Brigade – the Auckland, Canterbury, Wellington and Otago Battalions – and a supporting field ambulance were deployed in anticipation of an attack on the canal by Ottoman forces. This force was split between Ismailia and Kubri.[12] On 2 February, after the Ottomans launched a raid on the Suez Canal, elements of the brigade took part in repelling the attack, with the Canterbury Battalion suffering the division's first losses in battle, with two men being wounded, one of whom later died.[13]
Landing at Anzac Cove
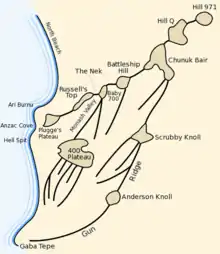
The New Zealand and Australian Division was the second division of the Australian and New Zealand Army Corps that landed at Anzac Cove on 25 April 1915. The Australian 1st Division made the initial landing and the New Zealand and Australian Division came ashore as the day progressed. For the initial landing, all troops coming ashore at Anzac Cove were under Bridges' command,[14] although the division's headquarters was landed around 10:00 am.[15] Command would revert to Godley the following day.[14] The New Zealand Infantry Brigade, temporarily commanded by Colonel Harold Walker, began coming ashore at 10:45 am.[16] Meanwhile, Colonel (later General Sir) John Monash's Australian 4th Brigade was held in reserve offshore.[17] The first to enter the battle was the Auckland Battalion, followed by half of the Canterbury Battalion, which had completed its embarkation just after noon. Tasked with extending the Allied line to the left of the Australian 3rd Brigade to the north of the landing beach, they were directed towards Walker's Ridge, advancing by way of Shrapnel and Monash Valley.[17][16]
The advance proved heavy going, but they soon found themselves involved in the struggle around Baby 700, amidst chaotic fighting as the Ottomans launched a counter-attack.[18][19] Baby 700 was subsequently lost,[20] and in the aftermath the New Zealanders took up positions along Walker's Ridge, which formed the extreme left flank of the landing area, reinforcing the Australians around Russell's Top.[21] The Otago Battalion landed between noon and 5:00 pm, and moved up to support the Aucklanders.[17] Having failed to secure the key ridges of Chunuk Bair and Sari Bair, Godley and his Australian opposite, Bridges, advocated for the troops to be re-embarked at the end of the day; however, the decision was made to consolidate the lodgement despite the Ottomans holding the high ground.[22]

The Wellington Battalion began arriving under darkness and were sent to Plugge's Plateau, while first elements of Australian 4th Brigade – three companies of the 15th Battalion – began coming ashore around midnight. As they arrived, they were sent to fill the gap between the left and right flanks of the Anzac perimeter, which required holding positions across the head of Monash Valley. As a result of these dispositions, by the end of the first day the New Zealand and Australian Division held the left flank of the landing and the 1st Division held the right and centre.[23] Early morning on the second day, three battalions of the Australian 4th Brigade – the 13th, 15th and 16th – came ashore, along with some personnel from the Wellington Battalion and a section of the New Zealand Howitzer Battery, operating 4.5-inch howitzers.[24] Due to the confused and haphazard landing, many units had become disorganised and mixed in together upon coming ashore. Throughout the day, efforts were made to rectify this,[14] and by the end of the day the New Zealand and Australian Division largely held the northern part of the Allied line, from Courtney's Post and beyond.[25] Throughout the day, the Allied line was subjected to localised attacks.[26]
On 27 April, the Ottomans launched a second counter-attack at Anzac Cove, resulting in heavy fighting around the perimeter.[27] It was eventually repulsed with heavy losses.[28] During this fighting, the New Zealand machine gun sections that were attached to each battalion were heavily committed. Having pushed as close to the front as possible to support their battalions, the crews suffered heavy casualties from Ottoman snipers. Meanwhile, the division's field artillery was landed throughout the day and with great effort the guns were moved into position to begin providing the indirect fire support that had been desperately needed during the first two days of fighting.[29]
Throughout the remainder of the week, the Allied troops continued to consolidate their positions around Anzac Cove, digging in and establishing lines of communication and supply. The Ottoman troops continued to hold the high ground, and the Anzac positions remained under observation and fire from snipers and machine guns. Ottoman mountain guns also kept up a steady bombardment.[30] As the landing around Anzac was consolidated throughout the first week ashore, efforts were made to destroy two observation posts overlooking the cove from its flanks: Gaba Tepe 2 miles (3.2 km) to the south, and Nibrunesi Point 4 miles (6.4 km) to the north, near Suvla Bay. Early on 2 May, a party of around 50 New Zealanders, drawn from the Canterbury Battalion, were assigned to attack Nibrunesi Point. Landing from a destroyer, they quickly overcame the small party of Ottoman troops holding the position. Although no guns were located, several buildings were then destroyed before the party re-embarked around midday.[31][32] Meanwhile, two days later, a detachment from the Australian 1st Division's 11th Battalion unsuccessfully attempted to raid the position around Gaba Tepe.[33]
Consolidation at Anzac Cove
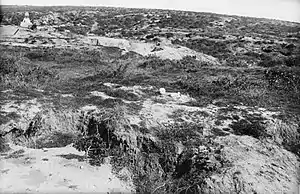
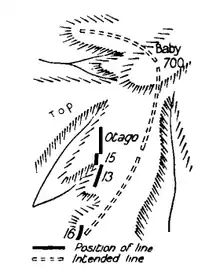
In the second week after the landing, efforts were made to straighten the Allied line, to prevent a salient from forming between Pope's Hill and Quinn's Post. Godley was ordered to recapture Baby 700,[34] which was considered a key feature of the northern perimeter, allowing the Ottoman troops observation and fields of fire down important Allied avenues of approach.[35] On 1 May, an Ottoman counter-attack was held off, and at 7:00 pm the following night, the division launched its attack on the left flank: the Canterbury Battalion around Walker's and the Otago Battalion around Pope's, tasked with maintaining contact with the Australian 4th Brigade, which was to advance around the far end of Monash Gully (sometimes also called Shrapnel Gully).[36] Under Colonel Francis Johnston, who had been ill during the landing and had temporarily deferred his command to Walker,[37] the New Zealand Infantry Brigade was tasked with assaulting the western aspect of Baby 700, while the Australians rushed the southern slope.[35]
Commencing at 7:15 pm, the two Australian assault battalions – the 13th and 16th[38] – were only able to push forward about 100 yards (91 m),[34] while the Otago Battalion was held up on its 3-mile (4.8 km) approach march from Walker's and were delayed by 90 minutes. Lacking artillery support to suppress the Ottoman defenders,[39] upon their arrival the Otago Battalion took heavy fire. Almost half the battalion became casualties,[40] but they managed to secure some of the lower parts of the feature, holding on overnight even though the Canterbury Battalion's attack was checked and turned back, having been hampered by poor maps and unfamiliarity with night attacks. Throughout the night, Ottoman troops attacked the Otago Battalion with grenades.[41] At midnight, a company from the Australian 15th Battalion was pushed forward into the gap that had formed between the Otago Battalion and the Australian 13th.[42] The following day a brief counter-attack was launched by the Ottomans, but the Anzac defensive line held, after which marines from the Royal Naval Division launched an attack between Quinn's and Pope's around Dead Man's Ridge, which was unsuccessful and resulted in heavy casualties. By the morning of 3 May, Dead Man's Ridge was firmly under Ottoman control.[41]
The failure of the second attempt to take Baby 700 marked the end of the first phase of the fighting around Anzac Cove.[43] Following this, the most forward part of the Anzac line was Quinn's Post. Having been occupied initially on the first day of the landing by troops from the Australian 4th Brigade, the position allowed Allied troops to move between several positions without observation. However, the Ottoman position around Dead Man's Ridge offered them a good firing position into the rear of the Allied position at Quinn's, and necessitated heavy sandbagging along the tracks to protect those moving up to the position. As a result, New Zealand engineers worked to build sandbag walls to protect the tracks around Quinn's, and to dig a sap trench to advance the Allied firing line.[44]
Krithia
As the situation around Anzac Cove settled, the British commander, Hamilton, decided to advance the line that had been established around Cape Helles, south of the lodgement at Anzac. To assist the British, French and Indian troops, two brigades – the Australian 2nd and the New Zealand Infantry Brigades – were detached from Anzac Cove to help launch an attack on Krithia with a view to capturing the Achi Baba peak.[45][46] Transported aboard several destroyers and barges from Anzac Cove south to Cape Helles, the detached New Zealanders were temporarily organised into an ad hoc composite division with the Australians and a naval brigade for the coming attack.[47] On 7 May, ammunition and entrenching tools were issued before the New Zealanders began moving up towards Gully Beach, in the Gulf of Saros, on the Aegean side of the cape. Throughout the night, the brigade was tasked with forming a reserve for the 29th Division, but was not required to go into action.[48]

On the morning of 8 May, the brigade received its orders to attack towards Krithia. Advancing along Fir Tree Spur, it would be a daylight assault with three battalions, while the Otago Battalion was placed in reserve, having suffered heavily at Baby 700. Planning for the attack was inadequate: there was no time given for preparation, and there was little knowledge of the objective, or the dispositions of the defending troops.[49] Nevertheless, in the first effort, they attempted to charge across a position dubbed the Daisy Patch, near a dry creek bed and lacking any cover.[50] As they went forward, the New Zealanders were engaged from both flanks. Coming under heavy machine gun and rifle fire from Ottoman defenders in the Gully Ravine,[49] the attack was halted after only 400 yards (370 m) and the New Zealanders were forced to dig in by 3:00 pm. Throughout the afternoon, the New Zealanders endured constant fire on their positions, which continued to inflict casualties.[51]
Around 5:00 pm, the Allies decided to make another effort, with the Australian 2nd Brigade launching a strong attack, which gained 660 yards (600 m). The New Zealanders, on the left of the Australians, joined the attack, with the Auckland and Otago Battalions charging forward, alongside the British 88th Brigade, and clearing an Ottoman trench line with bayonets fixed.[52] The main attack petered out after about two hours,[53] having gained another 330 yards (300 m), although the Canterbury Battalion worked throughout the evening to link up with the Australian 2nd Brigade.[52] By the end of the day, the New Zealand Infantry Brigade had lost 835 casualties and was down to a strength of 1,700 men, having started the campaign with 4,000.[54] Throughout the night, the New Zealanders consolidated their position and in the morning, took over part of the Allied line from the British 87th Brigade. They held this sector against several Ottoman counter-attacks until early morning on 12 May,[55] when the New Zealanders were relieved by the British 42nd Division.[56] Several days were then spent in camp around the Krithia road until the evening of 19 May when the brigade embarked to return to Anzac Cove, where an Ottoman counter-attack had begun.[55] A New Zealand artillery battery, however, remained at Helles until August.[57]
Reinforcement
Normally a British or dominion division contained three brigades. At the time of the landing at Anzac Cove, the intention had been to complete the New Zealand and Australian Division with the 29th Indian Brigade, commanded by Brigadier General Vaughan Cox;[58] however, as the situation at the Helles landing deteriorated, General Sir Ian Hamilton directed Cox's brigade there to support the British 29th Division.[59] Casualties had been heavy amongst the Australians and New Zealanders in the first period of fighting, with 1,395 casualties (killed, wounded and missing) among Australian units attached to the division and 1,667 from the New Zealand elements up to 15 May 1915.[60] Total losses amongst the ANZAC Corps amounted to around 8,000 casualties in the period from the landing to 3 May.[61] To make up for the deficiencies caused by the detachment to Krithia, and the losses from disease and combat,[62] in mid-May 1915, Australian and New Zealand mounted soldiers began arriving at Gallipoli as reinforcements. Arriving without their horses, they were to serve in a dismounted role as normal infantry. At this time, the Australian 1st Light Horse Brigade, under Colonel Harry Chauvel, and Brigadier General Andrew Russell's New Zealand Mounted Rifles Brigade joined the division.[63][64] As mounted brigades contained fewer men than infantry brigades, and these brigades had left a portion of their strength in Egypt to attend to the horses,[62] each brigade mustered only about 1,500 men.[65] Chauvel's men had reinforced the Royal Marines and Australian 4th Brigade, around Monash Valley, while the New Zealand Mounted Rifles reinforced Walker's Ridge and Russell's Top.[66][67] Shortly after their arrival, 100 men from the Canterbury Mounted Rifles carried out another raid of Nibrunesi Point, which was being used by Ottoman artillery observers to direct fire onto the beachhead, although the position was found to be deserted at the time of the raid.[68]
Ottoman counter-attack at Anzac
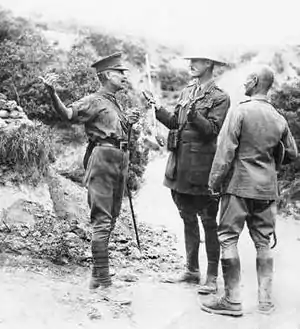
On 19 May, at Anzac, the Ottomans launched a determined counter-attack with the intention of forcing the Allies to evacuate.[69] Forewarned, the Allies were ready for the counter-attack, having moved reinforcements up behind the line. Just after midnight, heavy grenade attacks began along the positions held by the New Zealanders, and an artillery duel began. The assault began at around 3:00 am, as several waves of Ottoman troops charged the Allied line. Beaten back with determined machine gun and rifle fire, the effort was repelled with heavy losses being inflicted on the attackers. The defensive fighting during this period was the first major action fought by the newly arrived New Zealand Mounted Rifles Brigade who occupied a position around Walker's Ridge.[70] The Australian 4th Brigade, at the head of Monash Valley, was also heavily involved in repulsing the attack, with the 14th Battalion heavily engaged around Courtney's Post and the 15th Battalion holding on around Quinn's.[71] The 13th Battalion, and part of the 16th, were held in reserve in Monash Valley.[72] One member of the 14th Battalion, Albert Jacka, received the Victoria Cross for his actions during the fighting on 19 May.[73]
The attack had failed along the length of the line, and was halted the evening of the 19th. The attack was briefly resumed on 20 May, but again the machine guns turned back the attack, which was quickly halted.[74] Losses during the counter-attack stretched the Allied reinforcement system and throughout May dismounted light horsemen arrived as replacements.[62] A lull in the fighting followed, including a brief truce to bury the dead on 24 May, but the quiet was broken in the afternoon with a heavy exchange of fire before a quiet evening.[75]
The next major action came on 28 May, when a squadron from the Canterbury Mounted Rifles attacked an Ottoman position which had been firing down on their position around Nelson Hill (No. 2 Post). Over the course of several days, during the Battle for No.3 Post the New Zealanders took the position and then attempted to hold it amidst heavy counter-attacks, before eventually retiring on 30 May.[76] Meanwhile, on 29 May, the Ottomans attacked the Australian 4th Brigade around Quinn's. Mining operations had begun earlier in the month and although the Australians began counter-mining, early on 29 May, a large explosion destroyed part of the Australian line around Quinn's. A party of Turks then broke into the position, but after several hours of heavy close-quarters fighting, the Australian 15th Battalion restored their line.[77] In the process, several trenches were heavily damaged and required repair. After the fighting, in early June, the Australian 4th Brigade – having been in the line for five weeks – was relieved by the New Zealand Infantry Brigade.[78][79] Total losses for the division up to the end of June equated to 5,014 killed, wounded or missing.[60]
Chunuk Bair and Hill 971
After taking over the positions around Courtney's and Quinn's Posts, the New Zealanders sought to reorganise and improve each of these positions, under the command of Lieutenant Colonel William Malone. Throughout June, while the Third Battle of Krithia raged around Helles, operations around Anzac focused mainly on improving the positions around the Allied line, although there were several small scale skirmishes with both sides sniping at each other and making grenade attacks.[80] Tunnelling and sapping was also undertaken,[81] and several minor attacks were carried out by the Ottomans, with the last one coming on 29/30 June.[82] In July, Allied efforts turned towards preparations for a final offensive around Anzac to break the deadlock. To provide cover to assaulting troops moving from the beachhead to the outposts in the northern sector of the perimeter, the communication trench was widened by the Australians and New Zealanders throughout July. Maoris from the Native Contingent (later known as the New Zealand (Māori) Pioneer Battalion) arrived during this time, and assisted with the construction work.[83]
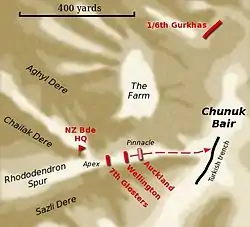
The plan for the offensive focused upon the capture of the Sari Bair Range, with preliminary objectives being Hill 971 and Chunuk Bair to its south-west.[84] Meanwhile, another landing would be made by predominately British forces at Suvla Bay, to the north of Anzac Cove, under the command of Lieutenant General Frederick Stopford.[85] Godley was placed in overall command of the offensive around Hill 971 and Chunuk Bair.[86] In July, the New Zealand and Australian Division was reinforced by elements of the 29th Indian Infantry Brigade and the British 13th Division in preparation for the coming offensive.[87] For the initial attack, the division was split into two elements. Johnston's New Zealand Infantry Brigade was to advance on the right up several steep features to capture Chunuk Bair via Rhododendron Ridge, while Monash and the Australian 4th Brigade was assigned to the left column under Cox, along with several British and Indian units, and was tasked with taking Hill 971.[88]
Departing Anzac under cover of darkness on 6 August, the attack on Hill 971 went awry from the beginning. Hampered by poor maps and inadequate knowledge of the ground over which the assault was to take place, the 4th Brigade briefly became lost during the approach. In addition, as Monash's soldiers felt uncertainly for their objective, they were harassed by small groups of Ottoman troops. The Australians were still well short of Hill 971 by dawn on 7 August. The following day, the 4th Brigade drove towards the Abdel Rahman spur line, where they came under heavy machine gun fire which halted their advance.[89]
Meanwhile, the drive on Chunuk Bair by the New Zealand Infantry Brigade, spearheaded by the Aucklanders made better progress, but was stopped short of the summit. The delay subsequently impacted upon the Australian attack at the Nek. A renewed attack was made on 8 August by the Wellington Battalion, during which the New Zealanders pushed forward from the Pinnacle and up Rhododendron Ridge to capture the summit. The Aucklanders and two British battalions then reinforced the Wellingtons. As the offensive failed elsewhere, the Ottomans poured reinforcements against Chunuk Bair, subjecting the New Zealanders and British troops there to several determined counter-attacks. Finally, late on 9 August, the New Zealanders were relieved by two battalions of British troops. The position was finally retaken by the Ottomans on 10 August, following heavy close quarters fighting.[90] For his actions on the summit, a New Zealand signaller, Cyril Bassett, received the Victoria Cross.[91]
Elsewhere, while the majority of the division was focused on Chunuk Bair, Brigadier General Frederic Hughes' 3rd Light Horse Brigade – allocated as corps troops at Anzac,[92] but assigned to Godley for the offensive[86] – undertook a costly attack towards Baby 700 and the Nek. Ultimately a futile effort, it resulted in heavy casualties for no gain, partially due to the delays elsewhere. In support, two regiments of the Australian 1st Light Horse Brigade, positioned around Quinn's and Pope's, carried out several feint attacks.[93][94] The attack around Quinn's began around 4:30 am on 7 August, when the 2nd Light Horse Regiment sent in the first of four waves of 50 troops. Coming under heavy machine gun fire, 49 of the 50 men in the first wave were killed and wounded, after which the attack was eventually called off. The attack around Pope's by the 1st Light Horse Regiment against the position dubbed the "Chessboard" fared little better, devolving into a series of grenade attacks that lasted three hours before the light horsemen withdrew, having lost 154 men out of the 200 that had been committed.[95][96]
Hill 60
The final major attack at Gallipoli came at Hill 60, a small feature situated to the north-west of Hill 971, which offered the Allies a line of communications between the beach around Anzac Cove and Hill 971.[89] This attack involved troops from the Australian 4th Brigade and the New Zealand Mounted Rifles Brigade (largely the Canterbury and Otago Rifles), as well as a battalion (the 18th) from the newly arrived 2nd Division, and the British Connaught Rangers and Hampshire Regiment. A supporting attack towards Susak Kuyu was also carried out on the left flank by two battalions of Gurkhas from the 29th Indian Infantry Brigade.[97][98]
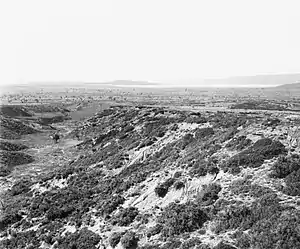
The first attempt, which was made on 21 August, managed to secure part of the hill, although Ottoman forces remained in possession of the top. A renewed effort on 22 August by 2nd Division troops resulted in heavy casualties due to hasty and poor planning.[99] Some gains were made throughout the morning, but heavy grenade attacks ultimately forced the newly arrived troops back around 9:00 am. Two hours later, the New Zealand Mounted Rifles attacked again on the left, and took about 200 yards (180 m) of trench line, which was then secured with sandbags. A lull followed for several days, during which the two sides traded grenade attacks and sniped at each other while working to improve their positions.[100]
The Australian 4th Brigade had been heavily depleted by the earlier fighting, and only 250 men remained available for the renewed attack on 27 August, which also involved troops from the New Zealand Mounted Rifles, reinforced by the Australian 9th and 10th Light Horse Regiments, and British troops from the Connaught Rangers. While the supporting preparatory artillery barrage proved ineffective, the assault eventually took some of the Ottoman trenches on the top of the hill. Nevertheless, it ultimately failed to secure the entire position. Three days of see-sawing close quarters fighting followed in which several counter-attacks were launched, and the position lost by the Allies, and then retaken.[98][99] Finally, on 29 August, the fighting ended with the Allies occupying the southern half of the position, while the Ottomans held the northern half.[101]
Losses during the fighting for Hill 60 had been heavy, and according to Harvey Broadbent it "effectively ended the fighting capacity of the New Zealand Mounted Rifles".[102] Out of 2,000 troops originally assigned to the brigade, 730 had gone into the fighting around Hill 60, and only 365 were fit afterwards. Meanwhile, the Australian 4th Brigade had also been heavily depleted, with a strength of only 968.[102][103]
Evacuation and disbandment
Following the failure of the August offensives, a period of stalemate followed around Gallipoli. As sickness rates began to rise British commanders began considering evacuation before winter,[104] with some strategists arguing that they should focus their efforts on the Western Front. Between mid-September and early November, the New Zealand brigades – except the supporting engineers, artillery and medical personnel – were able to detach elements for rest at Sarpi, on Lemnos, as the Australian 2nd Division arrived to relieve the two original Anzac divisions.[105] In November, now Major General Andrew Russell took over as division commander from Godley, who had been given command of the Australian and New Zealand Army Corps.[106] Later the same month a heavy blizzard blew, bringing snow to Gallipoli,[107] and after Lord Kitchener carried out an inspection of the theatre, the decision was made to withdraw the Allied troops from Gallipoli.[108] This was completed in several phases, with the final 3,000 rearguard troops from the division, which had been holding positions between Hill 60, Hill 100, Cheshire Ridge and the Apex, departing on 20 December 1915.[109]

Following the division's evacuation, it moved back to Egypt via Lemnos. In January 1916, the two Australian divisions were moved to Tel-el-Kebir to help defend the Suez Canal, while the New Zealand and Australian Division was sent to Moascar camp, near Ismailia, in reserve. By this time, a large number of reinforcements from Australia and New Zealand had arrived in Egypt. Numbers were so large that they could not be absorbed into the existing formations; as a result, new formations were planned and permission was sought from both the Australian and New Zealand governments to begin the reorganisation, prior to their dispatch to the Western Front.[110][111] The process of splitting the division began in late February 1916, when the Australian 4th Brigade and the Australian support troops departed Moascar to join the other Australian troops around Tel-el-Kebir. In their stead, replacement New Zealand units were brought on strength. On 1 March 1916, the process was completed with the division assuming its new designation of the New Zealand Division.[112]
While the 4th Brigade would be used to form part the Australian 4th Division, the New Zealand components were formed into the standalone New Zealand Division.[111] As part of this process, the New Zealand Infantry Brigade was formed into the 1st Infantry Brigade, keeping most of its experienced personnel,[113] and was joined by the 2nd Infantry Brigade and the New Zealand Rifle Brigade, formed mainly from reinforcements with a small cadre of veterans.[114] Together with the Australian 4th and 5th Divisions, the New Zealand Division was then formed into II ANZAC Corps under Godley prior to its dispatch to the Western Front, where they would see further fighting over the course of 1916–1918.[113] The division's mounted elements were re-united with their horses and organised into the Anzac Mounted Division, and took part in the Sinai and Palestine Campaign over the same period.[115]
Commanders
The following officers commanded the division during the war:[106][5]
- Major General Alexander Godley
- Major General Andrew Russell
See also
Notes
- Mallett, Ross. "First AIF Order of Battle 1914–1918: New Zealand and Australian Division". AIF Project. University of New South Wales (Australian Defence Force Academy). Archived from the original on 28 February 2015. Retrieved 16 October 2018.
- Waite 1919, pp. 4–6.
- Grey 2008, pp. 91–92.
- Hart 2013, p. 48.
- Grey 2008, p. 92.
- Waite 1919, p. 29.
- Bean 1941a, pp. 117–118.
- Bean 1941a, pp. 117–119.
- McGibbon 2000, pp. 201–203.
- McGibbon 2000, p. 359.
- Bean 1941a, p. 119.
- Waite 1919, p. 47.
- Waite 1919, pp. 53–55.
- Bean 1941a, p. 482.
- Waite 1919, p. 78.
- Hart 2013, p. 100.
- Waite 1919, p. 80.
- Waite 1919, pp. 77–80.
- Bean 1941a, pp. 302 & 312–313.
- Carlyon 2014, p. 168.
- Bean 1941a, p. 501.
- Coulthard-Clark 1998, p. 102.
- Waite 1919, pp. 84–87.
- Waite 1919, p. 87.
- Waite 1919, pp. 89–90 & 96.
- Hart 2013, p. 112.
- Bean 1941a, p. 504.
- Bean 1941a, p. 522.
- Waite 1919, p. 91.
- Waite 1919, pp. 86–89.
- Waite 1919, pp. 91–95.
- Bean 1941a, pp. 544 & 556.
- Hurst 2011, p. 60.
- Carlyon 2014, p. 237.
- Coulthard-Clark 1998, p. 105.
- Waite 1919, pp. 105–108.
- Carlyon 2014, pp. 147 & 238.
- Bean 1941a, pp. 584–585.
- Hart 2013, p. 183.
- Carlyon 2014, p. 238.
- Waite 1919, pp. 105–108 & 114.
- Bean 1941a, p. 591.
- Bean 1941a, p. xxii.
- Waite 1919, p. 114.
- Carlyon 2014, p. 239.
- Bean 1941b, p. 4.
- Waite 1919, pp. 119–122.
- Waite 1919, pp. 123–125.
- Carlyon 2014, p. 246.
- Waite 1919, p. 126.
- Waite 1919, pp. 126–127.
- Broadbent 2005, p. 141.
- Waite 1919, pp. 127–129.
- Carlyon 2014, pp. 246–257.
- Waite 1919, pp. 129–131.
- Carlyon 2014, p. 257.
- Carlyon 2014, p. 304.
- Hart 2013, p. 303.
- Waite 1919, p. 132.
- New Zealand Parliament 1915, p. 585.
- Bean 1941a, pp. xxii–xxiii.
- Grey 2008, p. 96.
- Waite 1919, p. 134.
- Bean 1941b, pp. 116, 139 & 184.
- FitzSimons 2015, p. 346.
- Bean 1941b, p. 116.
- Carlyon 2014, p. 264.
- Bean 1941b, p. 180.
- Carlyon 2014, p. 279.
- Waite 1919, pp. 139–140.
- Bean 1941b, pp. 148 & 152.
- Bean 1941b, p. 163.
- Carlyon 2014, p. 281.
- Waite 1919, p. 142.
- Waite 1919, p. 146.
- Waite 1919, pp. 149–151.
- Broadbent 2005, pp. 168–169.
- Bean 1941b, pp. 198–229.
- Waite 1919, p. 171.
- Broadbent 2005, p. 170.
- Bean 1941b, p. 285.
- Waite 1919, pp. 178–179.
- Waite 1919, pp. 194–195.
- Broadbent 2005, p. 190.
- Broadbent 2005, p. 222.
- Carlyon 2014, p. 343.
- Bean 1941b, pp. 454–455.
- Broadbent 2005, pp. 190–191.
- Coulthard-Clark 1998, p. 110.
- Broadbent 2005, pp. 216–221.
- "No. 29328". The London Gazette. 15 October 1915. p. 10154.
- Travers 2002, p. 273.
- Bean 1941b, p. 607.
- Bou 2010, p. 146.
- Carlyon 2014, pp. 405 & 409.
- Bean 1941b, pp. 628–631.
- Bean 1941b, pp. 725–726.
- Broadbent 2005, pp. 236–237.
- Coulthard-Clark 1998, pp. 110–111.
- Waite 1919, pp. 254–255.
- Bean 1941b, pp. 760–761.
- Broadbent 2005, p. 238.
- Bean 1941b, p. 761.
- Carlyon 2014, p. 509.
- Waite 1919, p. 261.
- Pugsley, Chris (1996). "Russell, Andrew Hamilton". Dictionary of New Zealand Biography. Retrieved 28 October 2018.
- Waite 1919, p. 274.
- Grey 2008, p. 98.
- Waite 1919, p. 284.
- Stewart 1921, pp. 5–6.
- Grey 2008, pp. 99–100.
- Stewart 1921, pp. 10–11.
- Grey 2008, p. 100.
- Stewart 1921, pp. 8–17.
- Gullett 1941, pp. 57–58.
References
- Bean, Charles (1941a). The Story of ANZAC from the Outbreak of War to the End of the First Phase of the Gallipoli Campaign, May 4, 1915. Official History of Australia in the War of 1914–1918, Volume I (11th ed.). Sydney, New South Wales: Angus and Robertson. OCLC 220878900.
- Bean, Charles (1941b). The Story of ANZAC from 4 May, 1915, to the Evacuation of the Gallipoli Peninsula. Official History of Australia in the War of 1914–1918, Volume II (11th ed.). Sydney, New South Wales: Angus and Robertson. OCLC 271462380.
- Bou, Jean (2010). Light Horse: A History of Australia's Mounted Arm. Melbourne, Victoria: Cambridge University Press. ISBN 978-0-521-19708-3.
- Broadbent, Harvey (2005). Gallipoli: The Fatal Shore. Camberwell, Victoria: Viking/Penguin. ISBN 978-0-670-04085-8.
- Brown, H.P., ed. (1915). New Zealand Parliamentary Debates: Legislative Council and House of Representatives – August 19 to September 17, 1915. Wellington: John Mackay, Government Printer. OCLC 191255532.
- Carlyon, Les (2014) [2001]. Gallipoli. Sydney, New South Wales: Macmillan. ISBN 978-1-74353-422-9.
- Coulthard-Clark, Chris (1998). Where Australians Fought: The Encyclopaedia of Australia's Battles (1st ed.). St Leonards, New South Wales: Allen and Unwin. ISBN 978-1-86448-611-7.
- FitzSimons, Peter (2015). Gallipoli. North Sydney, New South Wales: Random House. ISBN 978-0-59307-669-9.
- Grey, Jeffrey (2008). A Military History of Australia (3rd ed.). Melbourne, Victoria: Cambridge University Press. ISBN 978-0-521-69791-0.
- Gullett, Henry (1941). The Australian Imperial Force in Sinai and Palestine, 1914–1918. Official History of Australia in the War of 1914–1918, Volume VII (10th ed.). Sydney, New South Wales: Angus and Robertson. OCLC 988925773.
- Hart, Peter (2013) [2011]. Gallipoli. London: Profile Books. ISBN 978-1-84668-161-5.
- McGibbon, Ian, ed. (2000). The Oxford Companion to New Zealand Military History. Auckland, New Zealand: Oxford University Press. ISBN 0-19-558376-0.
- Hurst, James (2011) [2005]. Game to the Last: The 11th Australian Infantry Battalion at Gallipoli. Newport, New South Wales: Big Sky Publishing. ISBN 978-1-92194-113-9.
- Stewart, H. (1921). The New Zealand Division 1916–1919. Official History of New Zealand's Effort in the Great War. Auckland, New Zealand: Whitcombe & Tombs. OCLC 2276057. Archived from the original on 11 March 2017.
- Travers, Tim (2002). Gallipoli 1915. Charleston, South Carolina: Tempus. ISBN 0-7524-2551-X.
- Waite, Fred (1919). The New Zealanders at Gallipoli. Official History of New Zealand's Effort in the Great War. Auckland, New Zealand: Whitcombe & Tombs. OCLC 221448346.
External links
- Gallipoli campaign, NZ History
- Gallipoli timeline, NZ History
- Understanding Gallipoli, Australian War Memorial
