wikiHow is a “wiki,” similar to Wikipedia, which means that many of our articles are co-written by multiple authors. To create this article, volunteer authors worked to edit and improve it over time.
This article has been viewed 124,656 times.
Learn more...
Aside from web browsers, another software that benefits from plugins is Adobe Photoshop. Plugins are separate files that interact with Adobe Photoshop to increase its functionality and introduce new features. In Adobe Photoshop, plugins range from filter and patterns, to brush and pen styles. Sometimes, plugins will have their own installers and will give instructions, but when a plugin does not provide an installer or instructions, you might be confused on what to do. However, it's actually not so complicated.
Steps
-
1Download a plugin. Plugins are commonly free to download and install; just search the Internet for them.
- You can choose from a list of plugins at this site: http://www.adobe.com/cfusion/exchange/index.cfm?exc=16&cat=193&event=productHome&l=3&scat=253&from=1
- You can also try this site: http://www.adobe.com/support/downloads/detail.jsp?ftpID=4688.
-
2Extract the plugin you downloaded. Most Photoshop plugins come compressed inside a RAR or ZIP folder for easy transfer. Simply right-click on the downloaded file and extract it anywhere on your computer.Advertisement
-
3Copy the plugin files you extracted. Copy the entire folder that contains the plugin files. Do this by right-clicking on the folder and selecting “Copy” from the context menu.
-
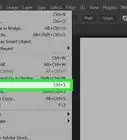
4Access your Adobe folder. The Adobe folder is located in the Program Files folder in Drive C of Windows.
- For Mac, it is located in Applications.
-
5Go to the Plugin folder. Inside the Adobe folder you’ll find another folder labeled “Adobe Photoshop.” Open this folder and look for the “Plugin” folder (C:\Program Files\Adobe\Adobe Photoshop CS5\Plugins).
-
6Paste the extracted plugin folder inside the “Plugins” folder. Right-click an empty area in the “Plugins” folder and select “Paste.” This will install the plugin. Wait for all the files to be copied.
-
7Launch your Adobe Photoshop. Do this by clicking its shortcut icon on the desktop or by opening it from the list of applications installed on your computer.
- If Photoshop is open while you copied and pasted the downloaded plugins into the Plugins folder, just restart the program.
-
8Test the plugins you installed. Select the tools required to use the plugins you installed.
- For example, if you installed brush style plugins, use the Brush tool to test the styles you’ve installed.


-Step-9-Version-2.webp)