X
wikiHow is a “wiki,” similar to Wikipedia, which means that many of our articles are co-written by multiple authors. To create this article, 28 people, some anonymous, worked to edit and improve it over time.
This article has been viewed 139,680 times.
Learn more...
This article will teach you how to slightly and very easily modify a Nerf N-Strike Longshot CS-6 in these simple steps that almost anyone can do. The following will enhance your gun's range, accuracy, and power by at least 2-3x depending on the age of your weapon.
Steps
Method 1
Method 1 of 2:
Plug the Hole in the Clip Slot
-
1Remove all darts and clip. Make sure that there is nothing loaded in the gun.
-
2Pull the rod back and then forward. This is just the same as reloading.Advertisement
-
3Flip the gun upside down and look into the clip slot with a flashlight. You will see a very small hole on the end of the black piston. When the gun fires, this hole lets an amount of air escape, disabling the gun's full potential power. (This is not the air restrictor, but it does reduce the power of the gun. )
-
4Place a piece of very strong, thin tape on the hole. This will block the air from escaping, causing more air to push the dart out of the barrel.
-
5Load a clip and test fire. The dart should go much farther now.


Advertisement
Method 2
Method 2 of 2:
Replace the Spring
-
1Unscrew the screws on your gun. You will need to have access to the inside of your gun, so remove the screws on the stock and body of the gun.
- The screws on the stock are a different size than those on the rest of the gun, so make sure to keep them separate to make it easier when you put the gun back together.
-
2Open up the gun. You will be working primarily with the part of the gun that contains the spring. This is the part that is made up of a thick cylinder connected to a thinner cylinder that runs along the middle portion of the gun. It is called the plunger tube.
- In order to remove this piece, you will have to remove the internal screw located directly to the lower right corner of the larger cylinder of the plunger tube.
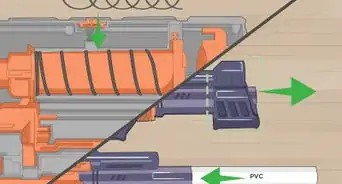
- Once you have removed this main piece, cut off the black rectangular piece of plastic that is connected loosely to the thinner cylinder.
-
3Remove the screws to open up the plunger tube. The wider cylinder is closed off at the end by a black piece of plastic. (This is the end of the piece around which the spring is coiled inside the cylinder; this will come up later.) Remove the screws that hold this piece on, and then pull out the long piece of plastic with the spring around it. Put this piece aside for now. When you look down the plunger tube, you should see another piece of plastic that blocks you from seeing the other end. The center part of this piece is held in place by 3 prongs.
-
4Remove the prongs. Using your pliers (you need long-necked pliers for this part), cut the three prongs. Turn the plunger tube upside-down so that the loose pieces fall out. Now you will be able to see through the whole tube, but there will still be a peg-shaped piece of plastic that partially blocks the tube.
-
5Knock out the peg. Put your screwdriver into the plunger tube so that the end of the screwdriver is located in the center of the peg. Use a hammer to hit the fat end of the screwdriver until you knock out the peg. Now you will be able to see completely through to the other end.
-
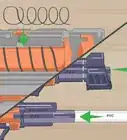
6Switch out your spring.
- Find the piece of plastic that holds that spring that you took out and put aside earlier.
- Unscrew the end so that you can remove the spring.
- Take off the spring and replace it with a more powerful spring.
- Then screw the end back on to hold the spring in place.
- Note that you can add multiple springs off different strengths, as shown here: http://www.youtube.com/watch?v=7tv2KvWjD0w.
-
7Put the spring piece back into the plunger tube. Screw in the screws that you unscrewed earlier, so that the cylinder looks just like it did earlier from the outside.
-
8Put the plunger tube back into place. Replace the plunger tube to its original position. There are a few small parts that you will need to line up, but this should not be a problem.
- Before closing the gun, make sure that the plunger tube lines up correctly with the barrel.
-
9Close the gun. Replace all the screws that you unscrewed earlier.
-
10Fire away. Your gun should now be more powerful. Have fun, but be careful.


Advertisement
Community Q&A
-
QuestionHow much is a Longshot these days?
 Community AnswerWhen I got my zombie one it was $40, but they run around $200 for the originals on Amazon.
 -
QuestionFor some reason my long shot started to get worse after I modded it. Can anyone help?
 Community AnswerYou should check to make sure you didn't crack your plunger tube.
 -
QuestionWhere can I find information about the different blaster types?Community AnswerYoutube's a good place. You can find info on modding all sorts of Nerf guns. But kids should be cautious when looking this stuff up on Youtube, channels like GunVsGun contain swearing.
Advertisement
Warnings
- This enhances the gun's power.⧼thumbs_response⧽
- Anything that ejects projectiles is not something to just go shooting people with and carrying in public! Use common sense and use it safely!⧼thumbs_response⧽
- More damage can be done to innocent bystanders after modification. Be extra careful if you do this modification.⧼thumbs_response⧽
Advertisement
Things You'll Need:
- A Nerf Longshot
Method 1
- Strong thin tape, preferably Scotch
- A flashlight or bright lamp (optional, but helps a lot!)
Method 2
- Screwdriver of appropriate size
- Long-necked pliers
- Replacement spring(s) of greater power
- Hammer


About This Article
Advertisement