First attack on Bullecourt
The first attack on Bullecourt (11 April 1917) was a military operation on the Western Front during the First World War. The 1st Anzac Corps of the British Fifth Army attacked in support of the Third Army, engaged in the Battle of Arras (9 April to 16 May 1917) further north. The Report of the Battles Nomenclature Committee (1921) called operations subsidiary to the main Battle of Arras the Flanking Operation to the Arras Offensive.[1]
| First attack on Bullecourt | |||||||
|---|---|---|---|---|---|---|---|
| Part of Flanking Operations to the Arras Offensive; Round Bullecourt (11 April – 16 June) Western Front, First World War | |||||||
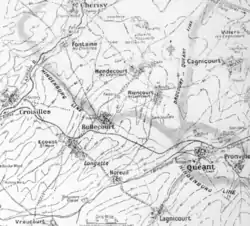 Relief map showing the Hindenburg Line and Wotan Line (Siegfriedstellung, Wotanstellung) defences around Bullecourt and Quéant, 1917 | |||||||
| |||||||
| Belligerents | |||||||
|
|
| ||||||
| Commanders and leaders | |||||||
|
Douglas Haig Hubert Gough |
Paul von Hindenburg Crown Prince Rupprecht | ||||||
| Strength | |||||||
| 1 division | 1 division | ||||||
| Casualties and losses | |||||||
|
10 April: 162 11 April: 3,289 (1,166 PoW) | 11 April: 749 | ||||||
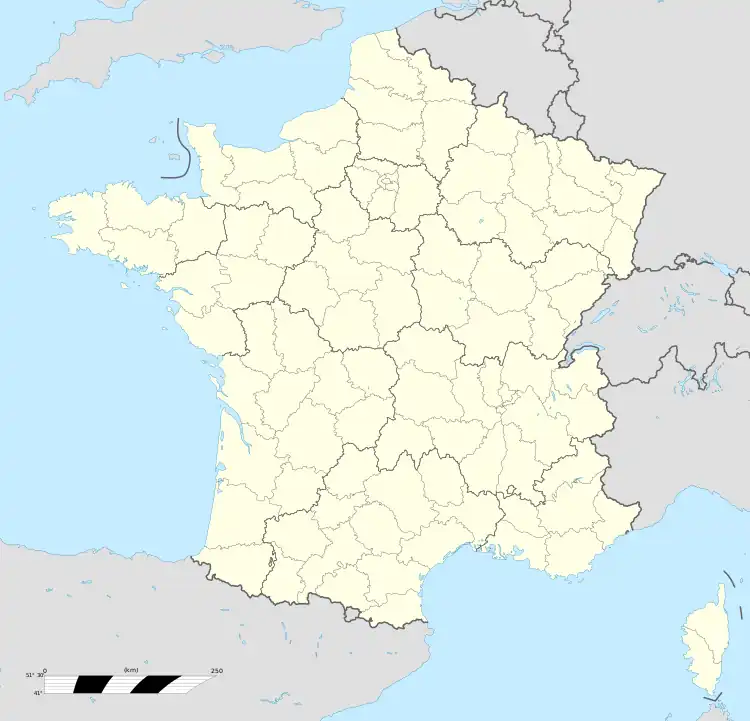 Bullecourt | |||||||
To compensate for the lack of time and artillery, a company of twelve tanks would lead the attackers into the Hindenburg Line defences by crushing the barbed wire in front of the defences of the XIV Reserve Corps (Gruppe Quéant). The tanks were late and the attack of the 4th Australian Division was postponed but the 62nd (2nd West Riding) Division did not receive the message and patrols advanced into the Bullecourt defences, suffering 162 casualties before they returned to the British front line, in what became known as the "Buckshee Battle".
Next day the attack on Bullecourt went ahead, despite reservations, although several tanks broke down and others went off course. Both Australian brigades got into the German front position but were cut off and gradually overwhelmed, only a few Australians managing to break out. The Australians suffered 3,289 casualties, including 1,166 prisoners against 749 German casualties.
The Australian division and corps commanders apologised to the survivors and their German equivalents received the Pour le Mérite. The survivors expressed bitterness and a great distrust of the tanks, despite them starting a panic among some of the German defenders; Australians blamed the 62nd (2nd West Riding) Division for allegedly leaving them in the lurch. Australian distrust of tanks and of General Hubert Gough, the Fifth Army commander, lingered for much of the remainder of the war.
Background
Hindenburg Line
General (General der Infanterie) Erich von Falkenhayn head of the German General Staff (Oberste Heeresleitung, OHL) was dismissed on 29 August 1916 and replaced by Field Marshal Paul von Hindenburg and General Erich Ludendorff. The Third OHL (the new supreme commanders) ended the offensive at Verdun on the Western Front and requested proposals for a new shorter defensive position in the Noyon Salient.[2] Generalfeldmarschall Crown Prince Rupprecht, commander of Army Group Rupprecht of Bavaria (Heeresgruppe Kronprinz Rupprecht), was ordered to prepare a rear defensive line and work on the new Siegfriedstellung (Siegfried Position/Hindenburg Line) began. As the situation on the Somme deteriorated, Hindenburg ordered that the Somme front be given priority in the west for troops and supplies.[3]
By the end of September, Rupprecht had no reserves left on the Somme and another thirteen fresh divisions were sent to the British sector, troops being scraped up wherever they could be found.[3] For the Abwehrschlacht (defensive battle) expected in 1917, the Hindenburg Line was to be built across the base of the Noyon Salient from Neuville-Vitasse near Arras, through St Quentin and Laon to the Chemin des Dames (the Ladies' Path) ridge.[4] The new fortified areas (Eventualstellungen, similar to ones built on the Russian front) were intended to be precautionary measures (Sicherheitskoeffizient) to shorten the Western Front and economise on troops, creating more reserves against the Entente offensives expected in 1917. The Siegfriedstellung had the potential to release the greatest number of troops and was begun first.[5]
Operation Alberich
Ludendorff ordered 9 February to be the first day of the Alberich Bewegung (Alberich Manoeuvre) and 16 March the first marching day.[6] On 17 March, the 1st Army, at the north end of the Bapaume Salient, withdrew swiftly; Riegel I Stellung was abandoned by 18 March and next day Boyelles and Boiry-Becquerelle were evacuated. The withdrawal to the Siegfriedstellung (Hindenburg Line), except for outposts and raids mounted on British outposts during 20 and 21 March, had begun.[7] Bapaume was abandoned, many of its houses bing set on fire. Next day, parties of Germans at Beugny in the Riegel III Stellung fought until nightfall then slipped away. A party at Vaulx-Vraucourt was surprised and driven back to Lagnicourt, which was lost on 26 March. A German counter-attack from Noreuil and a British attack on Bucquoy were repulsed.[8]
On 17 March, withdrawals by the 2nd Army south of the Somme began; by 18 March, the other German armies and the southern wing of the 6th Army began to withdraw from 110 mi (180 km) of the old front line [65 mi (105 km) as the crow flies]. The Somme River and canal crossings from Offoy to Péronne were destroyed and pools 0.5 mi (0.80 km) wide formed near road embankments, making crossings anywhere else impossible, the damage being made worse by the spring thaw. On 18 March the main body of German troops reached the Hindenburg Line (Siegfriedstellung) where work was still being done to remedy defects in the original position.[9] Outpost villages close to the Siegfriedstellung south of Quéant had to be held for longer than expected to complete the additional defences. Heudicourt, Sorel and Fins were lost on 30 March. The northern outpost villages were captured on 2 April and Lempire fell three days later.[10]
XIV Reserve Corps
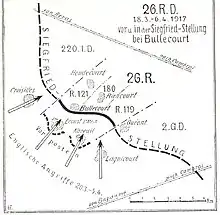
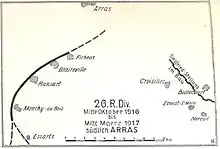
During the Battle of the Somme in 1916, German divisions had quickly become exhausted and it had proved impractical to replace corps headquarters and their constituent divisions at the rate necessary to rest tired divisions; corps HQs remained on the Somme and took over fresh divisions as they arrived.[11] By 1917 the connexion between Corps HQs and their component divisions had been dissolved on the rest of the Western Front and territorial titles introduced. After the retreat to the Siegfriedstellung, the XIV Reserve Corps (Gruppe Quéant, Generalleutnant [Lieutenant-General] Otto von Moser from 12 March 1917) held the Siegfriedstellung from Croisilles to Mœuvres.[12] The 27th (Württemberg) Division (Generalleutnant Heinrich von Maur) had spent February and March as a training division at Valenciennes and then been sent to relieve the 26th Reserve Division from Bullecourt to Quéant.[13]
The 27th (Württemberg) Division was unimpressed by the new positions, the trenches and wire having no deep dugouts, Mannschafts-Eisenbeton-Unterstände (Mebu shelters, pillboxes to the British) or rear defences. The 26th Reserve Division had spent the previous two weeks digging in but had made uneven progress. Over the weekend of 7–8 April, Infantry Regiment 124 (IR 124) of the 27th (Württemberg) Division took over the centre of the divisional sector in front of Riencourt from IR 180 (26th Reserve Division) three companies of I Battalion on the right (western) side, three on the left and two in reserve in the cellars under the village. The cellars did not have protected exits, making them vulnerable to artillery-fire. II Battalion was in reserve in Cagnicourt but the lack of dugouts prevented the troops being organised in greater depth. Infantry Regiment 120 (IR 120) took over on the right (western) flank and Grenadier Regiment 123 (GR 123) on the left (eastern) flank around Quéant. The Siegfriedstellung was on a reverse slope and the troops in the front position could not see far to the south-west, where the British Fifth Army was closing up to the Hindenburg Line from Écoust St Mein and the Quéant railway embankment. Observation posts were established forward of the trenches and reconnaissance patrols kept watch.[14]
Prelude
Fifth Army

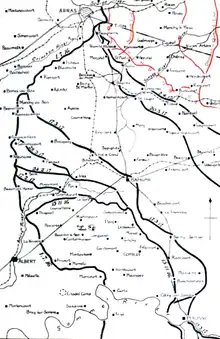
The original British plan was for the Fifth Army to co-operate with the Third Army attack into the salient formed around Bapaume during the Battle of the Somme in 1916. The German withdrawal to the Hindenburg Line (Siegfriedstellung) forestalled the British attack and the Fifth Army was ordered to push back German rearguards and prepare to attack the Hindenburg Line between Quéant and Bullecourt, to support the Third Army offensive, a much more difficult task. The Fifth Army had been reduced to two corps and stripped of artillery; bringing up the remaining guns and ammunition over the supply desert created by German demolitions was a slow process. The Hindenburg Line was far more formidable than the decrepit defences abandoned during the withdrawal. If the Fifth Army penetrated the Hindenburg Line the task of the Third Army, extending its attacks on 11 April southwards to the St Martin sur Cojeul and Wancourt areas, to push south-eastwards down the Arras–Cambrai road, would be eased.[15]
Bullecourt was 3.5 mi (5.6 km) from the road at Vis-en-Artois and under 2 mi (3.2 km) at Fontaine-lès-Croisilles, the first objective of the Cavalry Corps advancing in front of the Third Army.[15] Gough suggested that the Fifth Army could support the attack but for lack of means, only on a narrow front and Bullecourt was substituted for Quéant, which was a much more formidable objective, behind four defensive positions. The attack would then pivot to the right flank to capture the junction of the Hindenburg Line and the Drocourt–Quéant Switch Line (Wotanstellung). If successful, the 4th Cavalry Division would pass through to meet the Cavalry Corps from Arras. Fifth Army attacks on 2 April captured the German outpost villages from Doignies to Croisilles and Gough ordered that risks be taken to advance as much heavy artillery as possible. On 5 April Gough issued orders to the two Fifth Army corps V Corps (Lieutenant-General Edward Fanshawe) and 1st Anzac Corps (Lieutenant-General William Birdwood) for an attack on a 3,500 yd (2.0 mi; 3.2 km) front with Bullecourt in the centre.[16]
The village of Riencourt was the second objective and Hendecourt the third, where the 4th Cavalry Division was to advance to rendezvous with the Cavalry Corps. The Fifth Army received D Company, Tank Corps, five tanks for each corps and two in army reserve. The heavy guns were delayed by German road demolitions and the field artillery had to be moved in relays due to a shortage of horses. The 4th Australian Division (Major-General William Holmes) was not able to use all its seven artillery brigades until 8 April, even after hauling field guns with crews and ammunition by lorry. On the right of V Corps to the north, the 62nd (2nd West Riding) Division (Major-General Walter Braithwaite) took over from the 7th Division on 5 April; both divisional artilleries moved forward in stages and began wire cutting on 7 April. Australian patrols found no gaps in the wire, which was about 30 yd (27 m) deep, to the east of Bullecourt.[16]
8–9 April
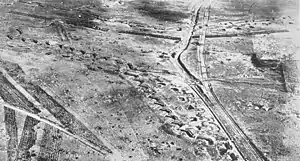
The Hindenburg Line defences enclosing the village of Bullecourt formed a re-entrant for about 2,500 yd (2,300 m) to the Balkonstellung (Balcony Trench) around Quéant, defended by the élite German 27th (Württemberg) Division.[17] On 8 April it was announced that wire cutting, begun on 5 April, would take another eight days.[16][lower-alpha 1] The Third Army began the Battle of Arras on 9 April with great success. Lieutenant-Colonel John Hardress-Lloyd, the commander of D Battalion, Tank Corps and the company attached to the Fifth Army suggested that rather than spreading the tanks along the attack front, they be concentrated to roll up the wire, creating a wide breach instead of several narrow ones. The twelve tanks should attack by surprise on a front of 1,000 yd (910 m), only opening fire when they were through the wire. Gough ordered the tanks to attack the next day, 10 April, on a front of about 1,500 yd (1,400 m) between Bullecourt and Quéant, leaving no time for rehearsals with the 4th Australian Division.[19]
The tanks were to advance first and crush the wire for the infantry and as soon as the Hindenburg Line had been captured, four tanks were to turn west towards Bullecourt, followed by an Australian battalion. The 62nd (2nd West Riding) Division was then to advance as far as Hendecourt. On the right flank, four tanks and Australian infantry were to capture Riencourt. Gough entertained doubts about the need for the attack because of optimistic reports from the Third Army and escaped prisoners of war that the Germans might retreat to the Drocourt–Quéant Switch Line (Wotanstellung). If patrols found that the objectives were unoccupied, both divisions were swiftly to occupy them. At dusk, patrols went forward and discovered that the Hindenburg Line was still occupied but that the wire cutting bombardment had made several lanes through the wire. Preparations were made in a rush, the 4th Australian Division to attack with two brigades, the 4th on the right and 12th on the left. A 500 yd (460 m) gap was left between the brigades to avoid a depression at a right-angle to the Hindenburg Line, thought to be an obvious killing ground, dominated by machine-guns. Tanks were substituted for infantry and the two brigades were to close the gap once into the German defences. The attack had to cover 500 yd (460 m) to the wire and another 100 yd (91 m) to the first trench at 4:30 a.m., about an hour and 48 minutes before the sun rose to evade crossfire in the re-entrant between Quéant and Bullecourt. Artillery-fire would continue as normal until zero hour then maintain barrages ion the flanks.[20]
Buckshee battle, 10 April
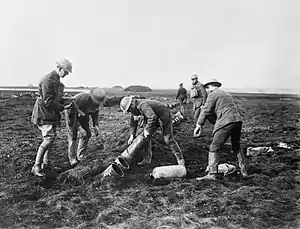
At 1:00 a.m. Bullecourt was subjected to a gas bombardment by Livens projectors and Stokes 4-inch mortars, as the Australians assembled and waited for the tanks to arrive. Six battalions were out in the snow of no man's land. The left of the 12th Australian Brigade was only 400 yd (370 m) from Bullecourt and dawn was approaching. Zero hour was put back but the tanks had only reached Noreuil, 2 mi (3.2 km) away, having had to feel their way forward through a snowstorm and needed another 90 minutes to reach their start line. Holmes postponed the attack to get the infantry back under cover before they were seen; snow began to fall again and shielded the retirement.[21][lower-alpha 2] Notice of the cancellation did not reach the 62nd (2nd West Riding) Division HQ until 4:55 a.m. Patrols of the 2/7th and 2/8th battalions, West Yorkshire Regiment began to advance from 4:35 a.m. and got through the fires belt of barbed wire ten minutes later. At 4:50 a.m. German machine-guns began to fire on the patrols and at 5:10 a.m. the British began to retire, leaving two Lewis gun crews behind. The patrols suffered 162 casualties by the time they were back over no man's land.[23]
Maur issued an order that opposing infantry had been seen over the railway embankment beyond Sector C North and that many troops were still there, warning that an attack was imminent against sectors A (Bullecourt) and C (Riencourt). No reinforcements were rushed to the area because of the crisis at Arras, the only troops in the vicinity being two battalions of the 2nd Guard Reserve Division working on a trench between Cagnicourt and Vis en Artois. Maur ordered that the divisional artillery was to conduct harassing fire in the railway; embankments and targets were to be bombarded at particular times. British batteries that were particularly effective were to be gassed as soon as they were identified; artillery and infantry strictly were to conduct liaison to ensure co-operation. During the night of 10/11 April, all three regiments of the 27th (Württemburg) Division sent out listening posts and patrols, which at 1:00 a.m. (British time, German time was an hour ahead) heard engine noise, taken to be from lorries carrying up supplies. British artillery kept up a considerable bombardment of the villages but not the Siegfriedstellung. A high state of alert was maintained and at 3:30 a.m. reports of activity at the wire were received, the men stood to and then at 3:45 a.m. the engine noise increased, indicating the beginning of a tank attack.[24]
11 April
British tank advance

Resuming the attack after the fiasco of the postponement would give another 24 hours to prepare but Birdwood repeated his misgivings about attacking at all. Gough referred the matter to GHQ, which took the view that the maximum effort by the Third Army on 11 April justified the risks. Some revisions of the plan were made; once Bullecourt was occupied, six tanks would come under the command of the 62nd (2nd West Riding) Division when it advanced on Hendecourt. At a conference at the 4th Australian Division HQ, the progress made in wire-cutting led to the infantry advancing fifteen minutes after the tanks, rather than waiting on a signal from the tanks that they were through the wire; the rest of the original plan was retained. One tank was unserviceable and only four of the remaining eleven reached their start line by 4:30 a.m. Drowning the sound of their engines with machine-gun fire failed and it was clear that they could be heard in the German defences. Three of the tanks which had arrived were those allotted to the 4th Australian Brigade.[25]
The tank on the right deviated to the right under fire from German machine-guns, suffered mechanical difficulties and returned to the railway. Another tank also veered right and crossed the first trench of the Balkonstellung opposite GR 123 about 500 yd (460 m) to the right of the attack front and was eventually knocked out by machine-guns firing armour-piercing (K bullet) ammunition. The next tank to reach the German lines was snagged by wire but crossed the first trench and was then knocked out. The last tank started late and followed a similar path to the first. The four tanks comprising the left-hand section were late and two were knocked out short of the German trenches; the third tank arrived after the Australian infantry had reached the German positions and silenced a machine-gun firing from Bullecourt. The tank was hit twice, returned to the railway and was hit again. The last tank ditched; one of the tanks that had veered off course and then returned, pulled it free and towed it over the railway, by when it was 6:30 a.m. Under the impression that the Australians were in Bullecourt, the crew drove over the German trenches and into the village where it suffered an engine failure. The surviving crew dismounted and got back to the railway. As tanks were immobilised, German artillery deluged them with shells and all but two were destroyed.[26][lower-alpha 3]
Australian attack
German artillery bombarded the assembly positions of the 4th Australian Brigade at 4:23 a.m. (British time, German time was an hour later). A green flare rose from Bullecourt at 4:35 a.m. followed by green and yellow flares. Australian troops tried to advance and suffered many casualties and where tanks did reach the German lines, they arrived piecemeal, diluting their psychological impact. As soon as the defenders realised that the expected attack had begun, SOS flares were launched all along the line for artillery-fire; when it arrived the infantry found it too sparse for Sector C. The Australians broke into the lines to the south-east of Riencourt along Sub-sector C1, held by the 1st Company IR 124. Reserves from IR 124 in Riencourt and the Artillerieschutzstellung (artillery-protection line) prevented the Australians from advancing further from a sunken road running south-east from the village but were then overrun, an improvised counter-attack was defeated and the last thirty survivors retreated. Sub-sectors C2 and C3 were attacked by tanks which drove along the trench parapets firing into them. A tank was caught in the wire opposite Sub-sector C3 and engaged by a machine-gun firing armour-piercing bullets and then hit by a minenwerfer. Sub-sectors C4 and C5, held by the 10th and 11th companies were attacked at the same time and suffered casualties as tanks drove back and forth, forcing them out of both front trenches. GR 123, to the east, was confronted by two tanks and at 150 yd (140 m) an officer took a machine-gun and fired 1,500 rounds, 77 of which penetrated, knocking out a tank and setting it on fire.[28]
_Inf.Div._11.4.1917.jpg.webp)
Some German infantry were shaken by the effect of the tanks and the priority given to their destruction by the German artillery protected temporarily the Australian infantry. The plan depended on the tanks and their failure left the Australian infantry committed to an attack with far less damage to the German wire than intended, no creeping barrage and no more assistance from the tanks. At 4:45 a.m. the 16th and 14th Battalions of the 4th Australian Brigade (Brigadier-General Charles Brand) had advanced in four waves, outstripping the tanks and receiving occasional artillery and machine-gun fire. As the first wave closed on the German front trench hundreds of flares went up, the dark of the infantry showing starkly against the snowy ground. The Australians made for the gaps in the wire, which turned out to be more cut than had appeared and got into the first trench. The wire in front of the second trench was uncut and the only way in was through German sally ports and communication trenches which had been fortified. The two battalions and parts of the 13th and 15th Australian battalions in support forced an entry, despite many casualties and bombed down the line. Many of the defenders ran for Riencourt but the rest fought on.[27]
The attack of the 12th Australian Brigade was delayed by the 46th Australian Battalion which waited for the tanks due to a misunderstanding over the amended plan and advanced at 5:10 a.m. The British bombardment of Bullecourt had lifted to let the attackers in and the battalion, with the 48th Australian Battalion in support met far more defensive fire than the 4th Australian Brigade. The right of the 46th Australian Battalion advanced into the depression separating the Australian objectives, following the only tank that had appeared and driven into the wire, where they were shot down in the gap; on the left the battalion stayed on course and got into the German defences. The 48th Australian Battalion found that the wire was uncut but found ways through, bombed to the right to the central road in the depression and set up a post. By 6:50 a.m. both brigades had taken their objectives apart from the 48th Australian Battalion which on its left flank had been unable to get beyond the Riencourt–Hendecourt road and the right flank of the 46th Australian Battalion which had been repulsed. Rather than being in tandem, the battalions were in echelon with only a slight overlap. The extent of the casualties left both brigades unable to attack their further objectives, Riencourt on the right and Bullecourt on the left, except for troops of the 4th Australian Brigade which bombed 150 yd (140 m) up a communication trench towards Riencourt.[29]
Early morning
Once it was daylight the Australians had great difficulty in passing reinforcements forward but a company of the 47th Australian Battalion reached the 12th Australian Brigade and small carrying-parties with more grenades got over. Neither of the brigades inside the German defences was able to extend its inner flank to close the gap between them and would have to hold on until dark. At 8:10 a.m. Brand ordered a barrage 200 yd (180 m) beyond the Hindenburg Line second trench and another barrage 200 yd (180 m) beyond the right flank but the artillery group commander demurred because of an erroneous report that tanks and infantry had passed through Riencourt and reached Hendecourt and another mistaken report that the British infantry were in Bullecourt. Eventually Birdwood was asked for a ruling and he refused to order the barrages; Fanshawe was also misled by the reports and ordered his division to advance into Bullecourt. The false reports led Gough to order the 4th Cavalry Division (Major-General Alfred Kennedy) to advance on Fontaine lès Croisilles and Chérisy, the Sialkot Brigade, waiting in the valley to the west of Écoust, was told at 8:45 a.m. that Bullecourt and Riencourt were "definitely reported as taken" and that it was to advance. A party of dismounted cavalry from the Lucknow Brigade ready to cut lanes in the German wire east of Bullecourt were stopped by machine-gun fire after twenty casualties.[30][lower-alpha 4]
German counter-attack
Oberst (Colonel) von der Osten, commander of the 53. Infanterie-Brigade (53rd Infantry Brigade) had devised a counter-attack plan which anticipated a break in to the German defences and at 8:15 a.m. ordered the reserve of IR 124 to counter-attack frontally as the storm detachments of IR 120 and GR 123 attacked from the flanks to roll up the Australians and recapture the front line. Machine-gun teams were sent to picked positions to cut off an Australian retreat and the Kampf-Truppen-Kommandeur (KTK, front position commander) of IR 124 gave the brief order,
Counter-stroke by 9th and 5th Companies along the line of Calvergraben, by 7th Company from the artillery-protection line in the direction of Sanssouci Mill and by 6th and 8th companies via V6 [communication trench]. All assault groups to set out at 9:00 a.m. [8:00 a.m. British time].[32]
The Australians in the German defences received artillery support only on distant objectives and were isolated from their headquarters. When the 4th Australian Brigade ran out of grenades it was forced back. Brand decided that it would be futile to send carrying-parties with supplies across the open ground swept by bullets and shells; the remnants of the brigade not taken prisoner tried to retreat and suffered many more casualties. The situation of the 12th Australian Brigade had deteriorated even more. The 46th Australian Battalion in the first trench had been reduced to a few men and was forced out without being able to warn the 48th Australian Battalion further forward, which was surrounded. When the 48th Australian Battalion realised its predicament it bombed its way along communication trenches back to the first trench.[33] The artillery of the neighbouring 2nd Guard Division and 220th Division added to the defensive barrage in front of Bullecourt and prevented any renewal of the Australian attack. As the Australians were being forced back, they were unable to salvage ammunition and grenades from the dead and wounded.[34] The British artillery had eventually begun to fire a barrage but this fell on the Australian-occupied trenches, making them untenable. The senior surviving Australian officer ordered the second trench to be evacuated and then the first. At 12:25 p.m. the 48th Australian Battalion, the last in the German trenches made an orderly retreated over the bullet-swept ground.[33] By noon the German counter-attack had succeeded; few Australians had managed to re-cross no man's land through artillery and machine-gun fire.[34]
Aftermath
Analysis
Hubert Gough wrote in The Fifth Army (1931 [1968]) that the snow made the tanks stand out, disguising the sound made by the tanks failed and that six were knocked out in no man's land. The Australian infantry suffered many casualties in the absence of the disabled tanks but managed to get into the Hindenburg line defences and were then driven out in desperate fighting.[35] In 1933 Charles Bean, the Australian official historian, wrote that the attack was "an experiment of extreme rashness" which failed "with shocking losses". Gough had persisted with the plan despite several warnings and that some Australian commanders had also made mistakes. Leaving a gap in the attacking line was understandable but the four tanks intended to fill the gap had been reduced to one, which failed to prevent German reinforcements and supplied being carried along a road running into the gap. Using only three machine-guns to camouflage the engine noise of the tanks was a serious error, which may have increased the number knocked out before they could be of use and some units waited too long; these failures only magnified the "gross blunders" of the plan.[36]
In 1940, Cyril Falls, the author of the British official History of the Great War volume 1917 Part 1, called the attack on 10 April a fiasco but that the fall of snow was fortuitous and allowed the troops of the 4th Australian Division to get back under cover in Noreuil. The 62nd (2nd West Riding) Division "suffered needless loss through a combination of accidents due to indifferent staff work". After the postponement on 8 April, Fanshawe gave an order, copied to the 1st Anzac Corps, that
Although an attack on a big scale will not be made on the 10th instant.... Preparations will be made to carry these out on receipt of orders from Corps HQ (sic).[37]
The order was not issued but on 9 April, the 62nd (2nd West Riding) Division was told to patrol at dusk that afternoon and evening; at 11:45 p.m. the division received a message "Zero hour will be 4:30 a.m." which was misconstrued as the order to begin the operation, not the patrols.[38]
After the defeat of 11 April, Australian opinion was unanimous that the failure of the tanks caused the disaster and that a conventional attack with an extensive preparatory bombardment and barrages would have succeeded. Falls wrote that the Australians were probably right and that a plan could have been devised for the tanks, not dependent solely on their success,
...to stake all upon them appears to have been putting too much trust in a largely untried machine.[33]
In The Blood Tub (1998 [2000]), Jonathan Walker wrote that by night on 11 April, the 27th (Württemberg) Division had achieved an outstanding defensive success, during a week of defeats for the 6th Army. Walker called the failure of the tanks a matter of lesser importance than the decision by Gough to attack a re-entrant, on a narrow front, with deep objectives. Gough admitted this after the war but pointed out that supporting the Third Army was important. Walker wrote that delaying the attack could have been more advantageous to the Germans, unit histories dwelling on the incomplete state of their defences. British communication failures occurred at all levels, the 4th Australian Division being blamed for the British attacking on 10 April after the main attack had been called off in the Buckhshee Battle. The machine-gun barrage to camouflage the sound of the tanks on 11 April was a failure and two tanks were left inside the German lines, the first that the Germans were able to study.[39]
Suspicion was sowed among the Australians of the usefulness of tanks, which was not dispelled until the Battle of Hamel (4 July 1918) and the use of Mark II training tanks, not impervious to armour piercing bullets must have contributed to the apprehensions of their inexperienced crews. The Australian artillery suffered from the lack of a preliminary barrage which prevented ranging and registration on likely targets, flash spotting and sound ranging still lacking reliability. Walker blamed the Australian artillery commanders for poor observation, staff work and inflexibility, turning down pleas for artillery support, preferring to trust the reports of their forward observers, the ultimate responsibility for which was borne by Major-General William Napier, the Fifth Army artillery commander.[39]
Jack Sheldon wrote in 2015 that the 53rd Infantry Brigade was required to explain why the Australians were able to break in to the German defences and replied that the sector of IR 124 had insufficient infantry, with only 110 men for two trenches 5,900–6,200 ft (1,800–1,900 m) long, with two platoons holding the front line. The small number of defenders was proper for an attack preceded by a long artillery bombardment but not an attack with little artillery-fire and by extremely determined infantry. Defensive artillery-fire was dispersed over too wide an area, the troops lacked experience of anti-tank tactics and the defences had been poorly designed, the wire in places being 230–260 ft (70–80 m) beyond the front trench (Kampfgraben) and with dead ground on the right flank. German reports blamed tanks for the break in on the sector of IR 124, the "momentary confusion" allowing the Australians to get into the German positions, especially with only one man to 8 ft 2 in (2.5 m) of trench. Attempts to increase the number of infantry in the area had come to nothing because of the immense pressure being exerted by the Third Army further north. The battle was judged a costly defensive success and the divisions on the flanks did not intervene. Maur and Moser were awarded the Pour le Mérite.[40]
Casualties
In the Australian Official History volume IV, The Australian Imperial Force in France, 1917 (1933 [1982]) Charles Bean wrote that the 4th Australian Brigade suffered 2,339 casualties out of the 3,000 men involved and the 12th Australian Brigade 950 casualties. German casualties were reported as 749, including 42 men taken prisoner. GR 123 suffered 49 casualties, IR 124 434 and IR 120 another 257. The German artillery suffered nine casualties and some of the losses of IR 120 was ascribed to the gas bombardment of 10 April.[41] Cyril Falls, the British official historian, wrote in the History of the Great War (1917 part I, 1940 [1990]) that on 10 April, the 62nd (2nd West Riding) Division suffered 162 casualties, most in the 7th West Yorkshire. On 11 April, the 4th Australian Brigade suffered 2,258 casualties of the 3,000 men in the attack and the 12th Australian Brigade suffered 909 casualties. The Germans claimed 1,166 prisoners for 750 casualties.[42] In 1998, Jonathan Walker wrote that the 27th (Württemberg) Division suffered only 138 fatal casualties and 531 men wounded, IR 124 suffering 434 casualties.[43] In 2015, Jack Sheldon wrote that the 27th (Württemberg) Division claimed 1,144 prisoners, two aircraft shot down and that 53 machine-guns (mostly Lewis guns) had been captured. Nine tanks had been destroyed, seven in or near the German lines and that units that could prove that they had knocked out a tank received a bounty of ℳ 500.[44]
Subsequent operations
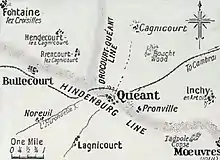
The sector was quiet for about three weeks, except for a constant drain of casualties to artillery-fire.[45] On 15 April the Germans conducted Operation Battering Ram (Unternehmen Sturmbock) against the 1st Anzac Corps. The attack was intended to delay the advance of the Fifth Army towards the Hindenburg Line, inflict as many casualties as possible and destroy equipment, particularly artillery. Sturmbock was to deprive the British of the means to attack on the southern flank of the battle to the north, to gain time to prepare more defences and to show that the retirement to the Hindenburg Line had not diminished German morale or the ability to attack.[46]
While the Fifth Army was preparing for a bigger effort, (the Battle of Bullecourt 3–17 May 1917), two divisions of the XIV Reserve Corps (Gruppe Quéant) and two of Gruppe Cambrai to the south, fell on the positions of the 1st Australian Division and 2nd Australian Division. The Australians repulsed the attacks, except at Lagnicourt, where German troops broke in, took prisoners destroyed six artillery pieces and recovered confidential documents. Australian counter-attacks cut off some of the attackers and inflicted 2,313 casualties against 1,010 Australian. The Fifth Army hurried forward more artillery and added more advanced posts. Preparations for the attack at Bullecourt continued and the Germans reinforced the Hindenburg Line (Siegfriedstellung) around Bullecourt.[46]
Notes
- Despite transfers, the Fifth Army had 26 batteries of medium and heavy howitzers but traffic jams caused many hold-ups. When the Bapaume railway station opened on 6 April, train delays caused huge traffic jams, made worse because lorries could carry only half-loads due to the German road demolitions. The heavy guns of the 1st Anzac Corps fired 1,100 rounds on 3 April, 1,695 and from 5 to 8 April averaged 4,000 rounds per day and 6,025 on 9 April.[18]
- IR 120 in Bullecourt spotted the Australians but were distracted by the 2/7th and 2/8th battalions, West Yorkshire Regiment.[22]
- Falls wrote that reports that tanks got into Riencourt and Hendecourt were caused by the foreshortening effect of the rolling down land. An Australian forward observation officer reported that two tanks and 200 infantry penetrated Hendecourt and that Indian cavalry could be seen west of Riencourt; no cavalry of the Sialkot Brigade came within 1.5 mi (2.4 km) of the village.[27]
- The foremost squadron of the 17th Lancers advanced to the railway, was bombarded and suffered eight casualties. The rest of the regiment was caught closely arrayed near Longatte and was fortunate to get away with several casualties among the horses.[31]
Footnotes
- James 1990, pp. viii, 19.
- Wynne 1976, pp. 134–135.
- Miles 1992, p. 455.
- Wynne 1976, pp. 133–134.
- Wynne 1976, pp. 133–134; Falls 1992, p. 110.
- Falls 1992, p. 115.
- Falls 1992, pp. 149–154.
- Falls 1992, p. 138.
- Falls 1992, pp. 127–135.
- Falls 1992, pp. 138–153.
- Wynne 1976, p. 126.
- Bean 1982, p. 394.
- Sheldon 2015, pp. 217–218.
- Sheldon 2015, pp. 217–219.
- Falls 1992, p. 357.
- Falls 1992, pp. 357–359.
- Sheldon 2015, p. 220; Oldham 2000, pp. 66–67.
- Falls 1992, p. 359.
- Falls 1992, pp. 359–360.
- Falls 1992, p. 361.
- Falls 1992, pp. 361–362.
- Falls 1992, p. 362.
- Wyrall 2003, p. 42; Oldham 2000, pp. 66–67.
- Sheldon 2015, pp. 221–222.
- Falls 1992, pp. 363–364.
- Falls 1992, p. 365.
- Falls 1992, p. 366.
- Sheldon 2015, pp. 223–224.
- Falls 1992, pp. 366–367.
- Falls 1992, pp. 367–368.
- Falls 1992, p. 368.
- Sheldon 2015, p. 224.
- Falls 1992, p. 369.
- Sheldon 2015, pp. 224–225.
- Gough 1968, p. 184.
- Bean 1982, pp. 349–354.
- Falls 1992, pp. 362–363.
- Falls 1992, p. 363.
- Walker 2000, pp. 107–109.
- Sheldon 2015, pp. 225–227.
- Bean 1982, pp. 343, 349.
- Falls 1992, pp. 363, 369.
- Walker 2000, p. 107.
- Sheldon 2015, pp. 225–226.
- Sheldon 2015, p. 228.
- Falls 1992, pp. 370–377.
References
- Bean, C. E. W. (1982) [1933]. "X Lagnicourt – The German Counter-stroke". The Australian Imperial Force in France, 1917. Official History of Australia in the War of 1914–1918. Vol. IV (facs. repr. Angus & Robertson, 1943 ed.). St Lucia, Queensland: University of Queensland Press. pp. 355–403. ISBN 0-7022-1700-X.
- Falls, C. (1992) [1940]. "XIV First Bullecourt and Lagnicourt: The German Attack at Lagnicourt, 15th April". Military Operations France and Belgium, 1917: The German Retreat to the Hindenburg Line and the Battles of Arras. History of the Great War Based on Official Documents by Direction of the Historical Section of the Committee of Imperial Defence. Vol. I (Imperial War Museum & Battery Press ed.). London: HMSO. pp. 370–377. ISBN 978-0-89839-180-0.
- Gough, H. de la P. (1968) [1931]. The Fifth Army (repr. Cedric Chivers ed.). London: Hodder & Stoughton. OCLC 59766599.
- James, E. A. (1990) [1924]. A Record of the Battles and Engagements of the British Armies in France and Flanders 1914–1918 (London Stamp Exchange ed.). Aldershot: Gale & Polden. ISBN 978-0-948130-18-2.
- Miles, W. (1992) [1938]. Military Operations, France and Belgium, 1916: 2nd July 1916 to the End of the Battles of the Somme. History of the Great War Based on Official Documents by Direction of the Historical Section of the Committee of Imperial Defence. Vol. II (Imperial War Museum & Battery Press ed.). London: HMSO. ISBN 978-0-901627-76-6.
- Oldham, Peter (2000) [1997]. The Hindenburg Line. Barnsley: Pen and Sword Books. ISBN 978-0-85052-568-7.
- Sheldon, J. (2015). The German Army in the Spring Offensives 1917: Arras, Aisne & Champagne. Barnsley: Pen & Sword Military. ISBN 978-1-78346-345-9.
- Walker, J. (2000) [1998]. "VIII The Guns at Lagnicourt". The Blood Tub, General Gough and the Battle of Bullecourt, 1917 (Spellmount ed.). Charlottesville, VA: Howell Press. pp. 115–126. ISBN 978-1-86227-022-0.
- Wynne, G. C. (1976) [1939]. If Germany Attacks: The Battle in Depth in the West (Greenwood Press, NY ed.). London: Faber & Faber. ISBN 978-0-8371-5029-1.
- Wyrall, E. (2003) [1924]. The Story of the 62nd (West Riding) Division, 1914–1919. Vol. I (facs, repr. Naval & Military Press, Uckfield ed.). London: The Bodley Head. ISBN 978-1-84342-467-3. Retrieved 29 September 2019.
Further reading
- Boff, J. (2018). Haig's Enemy: Crown Prince Rupprecht and Germany's War on the Western Front (1st ed.). Oxford: Oxford University Press. ISBN 978-0-19-967046-8.
- Foerster, Wolfgang, ed. (1939). Der Weltkrieg 1914 bis 1918: Die militärischen Operationen zu Lande Zwölfter Band, Die Kriegführung im Frühjahr 1917 [The World War 1914 to 1918, Military Land Operations Twelfth Volume, Warfare in the Spring of 1917]. Vol. XII (online scan ed.). Berlin: Mittler. OCLC 248903245. Retrieved 29 June 2021 – via Die digitale landesbibliotek Oberösterreich.
- Moser, Otto von (1920). Feldzugsaufzeichnungen als Brigade-Divisionskommandeur und als Kommandierender General 1914–1918 [Campaign Records as Brigade-Division Commander and Commanding General 1914–1918] (in German) (1st ed.). Stuttgart: Belser Verlag. OCLC 5828572.
- Spears, Sir Edward (1939). "Chapter XXVIII: The Eve of the Aisne, April 15th". Prelude to Victory (1st ed.). London: Jonathan Cape. pp. 479–481. OCLC 459267081.
- Wittelsbach, Rupprecht von (1929). Mein Kriegstagebuch [My War Diary (3 volumes)] (in German). München: Alleinvertrieb deutscher National Verlag A.G. OCLC 23801020.