GNU LIMS: Laboratory Information Management System for the Healthcare and Biomedical sectors
GNU LIMS, also known as Occhiolino, is a modern Laboratory Information Management System for the healthcare and biomedical sectors, that has emerged as a GNU Health sub-project.
The Laboratory Modules manage the request, creation and evaluation of laboratory analyses. As far as the LIMS (Laboratory Information Management System) functionality, GNU Health is very flexible. You will be able to link it to the patient chart and to the financial management of the Health Center.
It is able to link to financial management, and create services and invoices / billing from the laboratory requests.
Occhiolino has been integrated to GNU Health since the very beginning. Starting 3.2, there is a dedicated repository to concentrate the development efforts and to better serve the GNU Health community.
Requesting a Laboratory Test

To create a new Lab Test Request record there are two possibilities:
- Click on the Relate button in the patient form and choose the Request Lab Test command.
- Click on the Request Lab Test command in the main navigation.
In either case a dialog will open that allows you to enter the following information:
- Date: The date and time of the request (default values are the current date and time)
- Urgent: A checkbox to indicate an urgent request
- Patient: The name of the patient (link to a patient record)
- Doctor: The name of the health professional requesting the laboratory test
- Tests: One or more tests to be performed
Test Types

The laboratory module allows you to chose from a list of different lab tests and to create the specific one that you need, with their analytics, normal values, etc. etc.
Managing Laboratory Tests
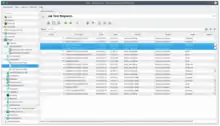
To check for new laboratory test request and to create test reports, the members of the laboratory staff will open the Health → Laboratory → Lab Test Requests section in the main navigation. This brings up the list of Lab Test Requests, showing all information described above.
In addition there is a State column indicating whether a request is a Draft or Ordered. As soon as a laboratory staff member creates a laboratory test by clicking the Action button and selecting the Create Lab Test command, the state of the request will change from Draft to Ordered. In addition the font color of the request will change from blue to black, making it easier to distinguish between pending requests and requests being processed.
Storing Laboratory Test Results
A laboratory test record allows to store the values of all test criteria contained in a specific test plus some extra information.
To access test results there are two possibilities:
- Click on the Relate button in the patient form and choose the Lab Reports command.
- Click on the Health → Laboratory → Lab Test Results command in the main navigation.
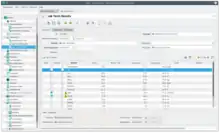
The Lab Tests Results form is structured as follows:
Main Info Tab
In the upper half of the Main Info tab you see information about the patient and about the test as a whole. The majority of this information is copied from the laboratory test request. In addition there are the following fields:
- Date of the Analysis
- Pathologist
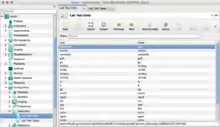
In the lower half of the Main Info tab there is the Lab Test Criteria table. This table allows to enter the following information for each criterion of the test:
- Warn
- Excluded
- Analyte
- Value
- Result - Text
- Lower Limit
- Upper Limit
- Units
- Remarks
Note: If you already know that the patient has a condition that will mark a certain value as warning (e.g the value of blood sugar in case of a diabetic persons or if the person is taking a specific medication), then check the Excluded box. This will provide to the physician a clearer vision of the patient's general and real condition.
Extra Info Tab
The Extra Info tab offers room for a summary of the results and a diagnosis.
Laboratory Reports
The print layout of a laboratory test is called a laboratory report. You can preview and print laboratory reports from the Lab Test Results form by clicking the Report button and choosing the Lab Report command. Any anomalous value (i.e. a value below the lower limit or above the upper limit of a test criterion) is printed in red.
Lab orders and Health Services
[Needs to be documented]
Invoicing a lab order
[Needs to be documented]
Configuration
To configure the available laboratory tests, go to the Health → Configuration → Laboratory section in the main menu. There you have two options: You can create, edit, or delete test types (including their test criteria), and you can configure the units used in the tests.
Lab Test Units
By double clicking on Health → Configuration → Laboratory → Lab Test Units you will get the list of all units defined in the system. Configuring a unit is quite simple, since there are only two fields:
- Unit
- Code (in most cases identical to Unit)
Lab Test Types
By double clicking on Health → Configuration → Laboratory → Lab Test Types you will get the list of all test types defined in the system. A test type serves as a template for an individual test. It contains a list of test criteria, including information about standard values for each test criterion. It is also linked to a product which allows to properly charge the test's cost to the patient.
Main Info Tab

In the Main Info tab of the test types form you can manage the following information:
- Test: The full name of the test (typically in capital letters)
- Code
Below there is the list of Test Cases (or test criteria, as they are called elsewhere) of a test type. Each test case consists of the following information:
- Sequence: A number to create an order within the test cases of a test type
- Analyte: The substance or aspect to be analysed
- Lower Limit: The lower limit of the range where a value is considered to be normal or not critical (used for information purposes, but also used to print a test case in red if a value is outside the range)
- Upper Limit: The upper limit of the range where a value is considered to be normal or not critical (used for information purposes, but also used to print a test case in red if a value is outside the range)
- Reference: A text field to add more information about the expected values of a test case
- Units: The unit of the values in a test cases (used for Upper Limit, Lower Limit, and the test value itself)
Using the Service field at the bottom of the Main Info tab each test type is linked to a product. The product defines the price of a test to be charged to the patient. So for each test type record you will need a product record; this product record is typically named after the test type.
Extra Info Tab
The Extra Info tab contains a text field Description for additional information about a test type.
Interfaces with Laboratories and LIMS
GNU Health allows to enter the results of the analytes manually for any type of test. However, in many cases, it's not feasible to enter this information manually, since it will be a lot of work and prone to human error.
Generally, the health professional creates a lab test order, and this is sent to a laboratory. When the laboratory processes the order, the results are sent back in either paper or digital form. Moreover, in larger institutions, the center connects with their own laboratories and lab systems. The interface will allow to automatically retrieve the results from the lab and upload them to GNU Health.
In order to automate the task for processing the data, both the health institution and the laboratory need to agree in the way the data format and transferred. There are different formats and message exchange methods (csv, xml, web services, HL7, ... ), and they can fit different scenarios.
Basic workflow
In most cases, we would need to set up a basic workflow. Let's think about a basic hemogram / Complete Blood Count (CBC)
- The health professional creates a test order, that contains one (or more) lab test type, with its unique ID. This lab test ID includes key information such as the lab test type, patient, ordering physician, date of request, ...
- The information on that test ID is then sent to the lab
- The lab prints the test ID labels and place them on the test tube
- The nurse extracts the blood sample from the patient and places in the tube labeled with the unique lab test ID
- The sample is then taken to the analyzer, this reads the bar code of the lab test and processes the CBC
- The lab technician generates the report with the result for each analyte associated to the lab test request ID
- This result is sent to GNU Health in the way agreed by both parties (laboratory and institution)
- GNU Health LIMS interface will process and upload the result to the lab test.
Of course, there can be higher or lower degree of automation, but most of this steps will exist in many scenarios.
Sample interface
As part of the GNU Health documentation, there is now a sample script that will take a csv encoded batch file and upload the results to GNU Health.
This program reads a CSV formatted file that contains the lab test id, the analytes and its results.
Included in the directory, there is a sample TEST006.csv, that contains the results of the test "TEST006", a "Complete Blood Count - CBC"
You can customize the program (GNU Health server name, credentials, ...), as well as the lab test result file. Of course, the name of the lab test result can be change to meet your needs.
You can find the latest version of the sample program in the GNU Health mercurial server, on the development branch :
http://hg.savannah.gnu.org/hgweb/health/file/tip/tryton/doc/samples/interfaces/lab
Requirements
This current components and versions are:
- GNU Health : 3.0
- Proteus Tryton library : 3.8
Installing proteus :
$ pip2 install --user "proteus>=3.8,<3.9"
Usage
Invoke the program and pass the csv formatted file as an argument e.g.:
$ ./gnuhealth_csv_lab_interface.py TEST006.csv
The main program steps are :
- Test connection to the GNU Health server
- Check that the Lab test has been created on GNU Health (eg, TEST006)
- Check that the analytes from the csv files are on the system
- Upload the results.