Introduction
In this chapter we will go through the technical aspects behind the GNU Health Federation.
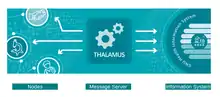
The GNU Health Federation has three main components
- Nodes
- Message Server
- Health Information System / Person Master Index
The HMIS node installation and configuration has already been described in previous chapters. In this chapter we will mainly focus on the Health Information System and the Message / Authentication server (Thalamus).
Health Information System Server (HIS) configuration
The Person Master Index and Health Information System are both included in the HIS component of the GNU Health Federation.
Initializing PostgreSQL for the HIS and Person Master Index
The following documentation applies to a demo / test database, that we will call "federation"
1) Create the database
$ createdb federation
3) Create the Federation HIS schema Move to the "demo" directory in Thalamus and execute the following SQL script
$ psql < federation_schema.sql
4) Initialize the Federation Demo database:
$ bash ./populate.sh
Thalamus configuration
The Thalamus project provides a RESTful API hub to all the GNU Health Federation nodes. The main functions are:
- Message server: A concentrator and message relay from and to the participating nodes in the GNU Health Federation and the GNU Health Information System. Some of the participating nodes include the GNU Health HMIS, mobile PHR applications, laboratories, research institutions and civil offices.
- Authentication Server: Thalamus also serves as an authentication and authorization server to interact with the GNUHealth Information System
Technology
RESTful API: Thalamus uses a REST (Representional State Transfer) architectural style, powered by Flask technology
Thalamus will perform CRUD (Create, Read, Update, Delete) operations. They will be achieved via the following methods upon resources and their instances.
- GET : Read
- POST : Create
- PATCH : Update
- DELETE : Delete.
The DELETE operations will be minimal.
JSON: The information will be encoded in JSON format.
Installing Thalamus
Thalamus is a flask application, and is pip installable. Using the "gnuhealth" operating system user, install Thalamus server locally.
$ pip3 install --user thalamus
At this point you can run and test Thalamus directly from the Flask Werkzeug server,:
$ python3 ./thalamus.py
This is ok for development and testing environments, but for production sites, always run Thalamus from a WSGI container, as described in the next section.
Enable SSL for encrypted communication
Generate a self-signed certificate and private key
$ openssl req -newkey rsa:2048 -new -x509 -days 3650 -nodes -out gnuhealthfed.crt -keyout gnuhealthfed.key
Place the certificate (gnuhealthfed.crt) and private key (gnuhealthfed.key) under /opt/gnuhealth/certs
Keep a backup of them in a safe place.
Running Thalamus from a WSGI Container
In production settings, for performance reasons you should use a HTTP server. You will find examples on running Thalamus from uWSGI and gunicorn.
Running Thalamus from uWSGI
uWSGI is a very robust and fast application that is used as a Web Server Gateway Interface in the context of Thalamus, to forward requests to Thalamus coming from other applications (eg, the Federation Portal or the HMIS node).
We have included a uwsgi sample configuration file (etc/thalamus_uwsgi.ini) with SSL enabled:
[uwsgi]
master = 1
https = 0.0.0.0:8443,/opt/gnuhealth/certs/gnuhealthfed.crt,/opt/gnuhealth/certs/gnuhealthfed.key
wsgi-file = thalamus.py
callable = app
processes = 4
threads = 2
block-size = 32000
stats = 127.0.0.1:9191
To execute Thalamus with the default configuration file:
$ uwsgi --ini etc/thalamus_uwsgi.ini
All these arguments can also be passed to the command line.
Running Thalamus from Gunicorn
Note: There are some issues with delay on requests and closing connections when using SSL from the vueJS portal on gunicorn.
Gunicorn supports WSGI natively and it comes as Python package. We have included a simple, default config file (etc/gunicorn.cfg) to run Thalamus from Gunicorn with SSL enabled.
For example, you can run the Thalamus application from Gunicorn as follows. The default configuration file uses secure (SSL) connections:
$ gunicorn --config etc/gunicorn.cfg thalamus:app
Access Control
Thalamus uses a “role” approach related to Authorization. It’s basic, yet versatile.
Each role has the following methods permissions: GET, PATCH, POST, DELETE
The permissions work at endpoint level. Examples of endpoints are "person" or "page" of life.
Following there is sample of the “roles.cfg” file, which shows three main roles: end_user, health_professional and root.
[
    {"role": "end_user",
     "permissions": {
        "GET": ["person", "book","page","password"],
        "PATCH": ["person","page"],
        "POST": ["page", "password"],
        "DELETE": [],
        "global": "False"
        }
    },

    {"role": "health_professional",
     "permissions": {
        "GET": ["people","person","book","page"],
        "PATCH": ["person", "page"],
        "POST": ["person", "page"],
        "DELETE": [],
        "global": "True"
        }
    },

    {"role": "root",
     "permissions": {
        "GET": ["people","person","book", "page","password"],
        "PATCH": ["person","page"],
        "POST": ["person","page",  "password"],
        "DELETE": ["person","page"],
        "global": "True"
        }
    }
]
Once the user has provided the right credentials, she / he will have the access level to the documents associated to the roles. A user can have one or multiple roles. For example, a health professional usually belongs to two groups:
- person : she create and read her documents, change her password, etc. Usually her domain is restricted to herself. She can not act on others documents
- health_professional : She can see her patient medical history, but she can not change her password.