There are 64,864,800 possible setups for each side, although Gold in effect only has half that many, since an east-west reflection amounts to the same setup for the one going first. Players frequently experiment with different setups, but certain guiding principles are usually followed:
- Elephant centralisation: The elephant usually starts on the d- or e-file; less commonly, on the c- or f-file.
- Activity: A piece typically does not start directly behind a weaker piece. A strong piece usually does not start directly behind a trap, unless one has a plan to quickly advance it through the trap and still defend the trap from behind.
- Balance: There should be some strength on each wing, so that each home trap has some protection.
- Rabbit protection: Since rabbits can't retreat, they should not begin exposed to easy pulls.
A small minority of the possible setups meet these criteria. However, there is still plenty of scope for variation. A setup which buries strong pieces may be a form of handicap.
Elephants tend to stay near the centre until strong enemy pieces draw them to the outskirts. Unless both sides play a lone elephant opening, an early camel or horse advance could set the tone. The placement of the camel and horses is thus the essential characteristic of a setup. A symmetric setup, with the camel in the middle and a horse on each wing, is the most flexible. However, one planning a quick trap attack might begin with the camel decentralized, seeing that as a way to save time. Silver does this more often than does Gold; if the gold camel began decentralized, the silver horses could both start far away from it, giving Silver an early alignment advantage.
Symmetric setups
| ||||||||||||||||||||||||||||||||||||||||||||||||||||||||||||||||||||||||||||||||||||||||||||||||||
Each setup is a mirror reflection of itself, except where the elephant and camel are concerned. |
The diagram shows two standard symmetric setups. Gold uses the classic 99of9, named for a player who popularized it early on. A 99of9 setup by Gold places the elephant and camel on d2 and e2, the horses on b2 and g2, and the dogs and cats on d1, e1, c2, and f2. Rabbits are arranged so that they won't get in the way of friendly pieces; a rabbit advanced in the middle could be a problem, whereas the opponent has less to gain by pulling an a- or h-file rabbit. Eventually, the c- and f-file rabbits might step into the center to block the goal line.
The horses will step forward, to defend the traps from the sides. One horse or the other might soon advance to create a threat. As the least exposed key squares, the squares behind the traps are almost always occupied during the opening, to prevent losses at home. Typically, the pieces that begin behind the traps stay in place for a while, so as not to waste steps. It is thus not common for a strong piece to begin directly behind a trap. Cats often start behind the traps, but a dog behind a trap would make that trap safer from attack, since a dog can't be pushed aside by an enemy dog. Cats and dogs are therefore sometimes swapped in the 99of9 setup. A dog which starts directly behind a trap might later advance through it, although this could be blocked if the opponent attacks the trap. The piece behind a trap might itself be vulnerable to capture, so having a dog behind a home trap could be costly if one ends up in a race, or if the opponent gets a strong attack on that trap.
Silver uses the Fritzlein setup, placing rabbits behind the traps. With the silver cats on the b- and g-files, Silver might quickly advance on a flank; a cat might either defend its home trap from the side or support an attack. If the c7 or f7 rabbit is pushed or pulled forward, this will complicate any home trap control fight for Silver, since a rabbit can never step backward. With that said, winning a fight at home may not be a priority for one inclined toward aggressive play. Silver's setup may thus be good for a player who intends to attack somewhat quickly and not worry too much about his home traps.
Note that the silver elephant does not directly face its gold counterpart. Had Silver placed her elephant on e7, the gold elephant could immediately go to e6 and delay the silver elephant's advance. That would be bad for Silver, unless she had a quick way to attack and force the gold elephant to return home.
MH setups
| ||||||||||||||||||||||||||||||||||||||||||||||||||||||||||||||||||||||||||||||||||||||||||||||||||
Silver might quickly attack in the west. |
At left, Silver uses an MH (camel-horse) setup. Silver plans to advance her horse and camel in the west, so that a gold horse cannot hold b3. Key to Gold's response is his camel, which could move west for defence, or east for a camel-horse counterattack against f6; the gold camel should quickly commit to one or the other, before Silver gets an advantage.
Silver's attacking threat justifies having her elephant directly face the gold elephant. Gold might play 2g Ed2nnnn, but then Silver could play 2s ha7s mb7s cc7w hg7s and, if the gold elephant stays on d6, 3s ed7wsse. Silver loses some time with sideways steps, but Gold will lose even more time moving his elephant, which must step around its silver counterpart and go back home to defend c3. When Silver uses an MH setup, Gold must either attack first or be prepared to quickly defend. In any event, an elephant should not immediately advance four squares if that will allow for a strong attack by the opponent.
| ||||||||||||||||||||||||||||||||||||||||||||||||||||||||||||||||||||||||||||||||||||||||||||||||||
The setup from this game. |
At right, Gold has set up for a quick EMH attack in the west. To slow this down, the silver camel directly faces the gold camel. Silver could place both horses in the east, far away from the gold camel, but prefers to place one horse in the middle so that it can quickly go to either wing. Gold might move his camel east and still get a strong western attack if there is no silver horse in the west; to avoid being pulled toward c3, the silver camel may need a supporting horse.
Another idea for Silver (illustrated here) would be to put the elephant in the west and camel and horse in the east, reasoning that Silver will be faster in an attacking race since Silver's attack is further from the elephants. Yet another idea, from this game, is to play an approximate mirror image of Gold's setup, leading to a slow maneuvering opening.
Even having placed the camel in the west, one might quickly move it east. A setup is not a hard commitment to a particular strategy; the game must be played move-by-move. If Silver places her camel directly opposite Gold's camel, Gold may decide to move his camel to the other wing and thus avoid a gridlock.
HH setups
| ||||||||||||||||||||||||||||||||||||||||||||||||||||||||||||||||||||||||||||||||||||||||||||||||||
The setup from this game. |
Placing his horses and elephant together in the west, Silver intends to create a fairly quick threat on that wing. While a full-on EHH trap attack could occur at some point, an HH setup is usually played less aggressively than an MH setup, as it is harder to take the b3 square. Silver might pull the western gold horse and create a basket with the silver horses, which might then frame the gold horse while the silver elephant goes elsewhere.
Gold might move his camel west to face the silver horses. However, an EMH attack against c6 could leave Gold vulnerable in the east, where the silver camel would then be the strongest piece. Gold might first attack in the east; the silver camel might have trouble holding g6 with no silver horse nearby. A silver dog is placed on f7 to keep that square as secure as possible; if the silver elephant had to come east to defend, that would be the end of any EHH threat in the west.
An HH setup by Gold would be extremely risky, as the silver camel could directly face both gold horses, and weak silver pieces might face the gold camel, causing it to waste its strength. In this game, a silver dog and cat were strong attackers in the east, and neither gold horse could do much in the west.
Statistics
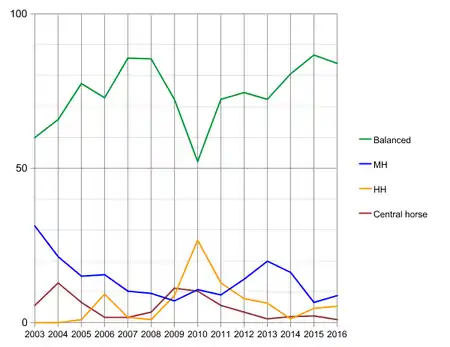
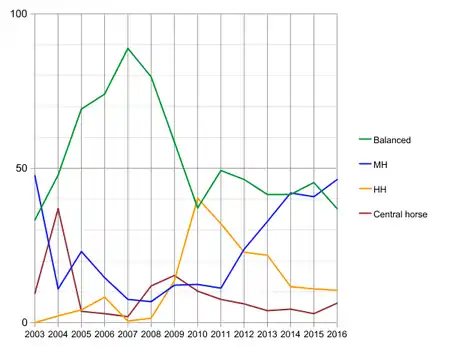
These statistics are based on games between two humans each rated over 1800. Setups where one wing has no horse or camel are rare and excluded here. Note that in this classification, 'old-style' EHH setups (e.g. with b- and d-file horses) are counted as central horse setups.